Environment Setup
Content:
- Create VPC and Networking
- Create Security Groups
- Create RDS Subnet Group
- Create DMS Subnet Group
- Source & Target Database Group
- Create EC2
- Connect EC2 and launch data
- DMS Setup
1.1 Create VPC and Networking
Access VPC Console
- Sign in to AWS Console.

- Search for VPC in the search bar.
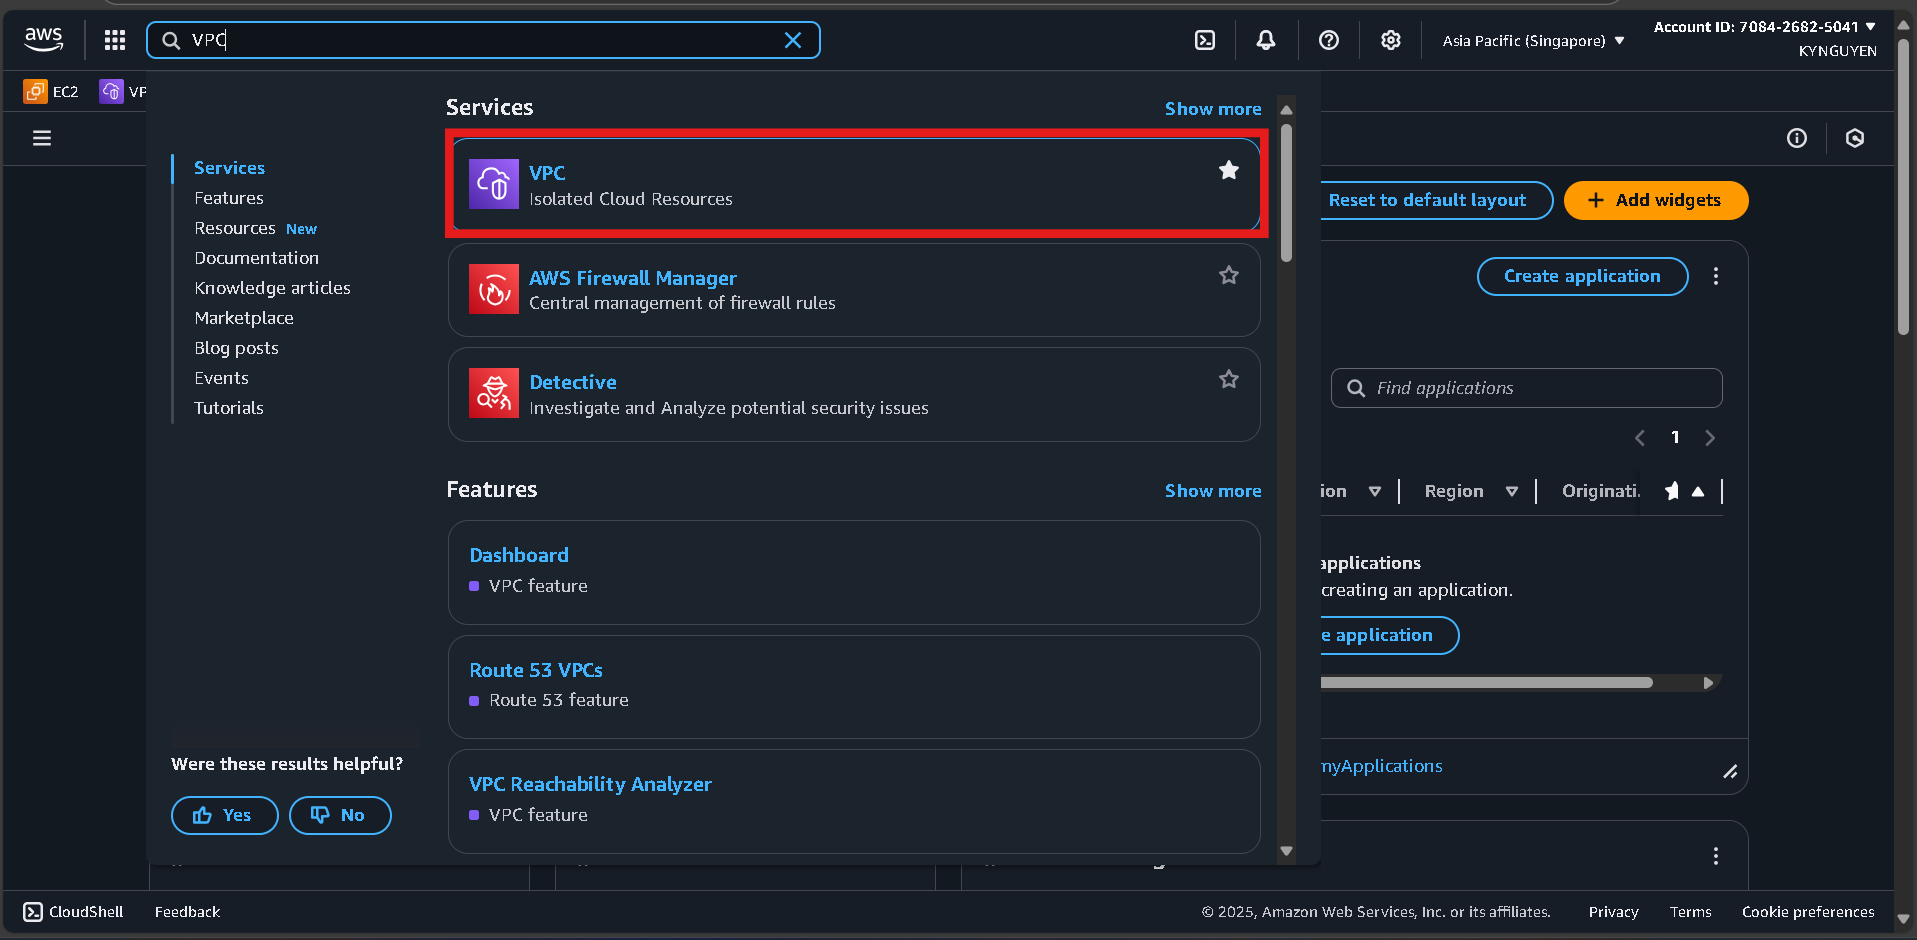
- Click VPC service.
Create a New VPC
- Click Create VPC → select VPC and more.

- Configure:
- Name tag:
migration-vpc - IPv4 CIDR:
10.0.0.0/16 - Number of AZs:
2 - Public subnets:
2 - Private subnets:
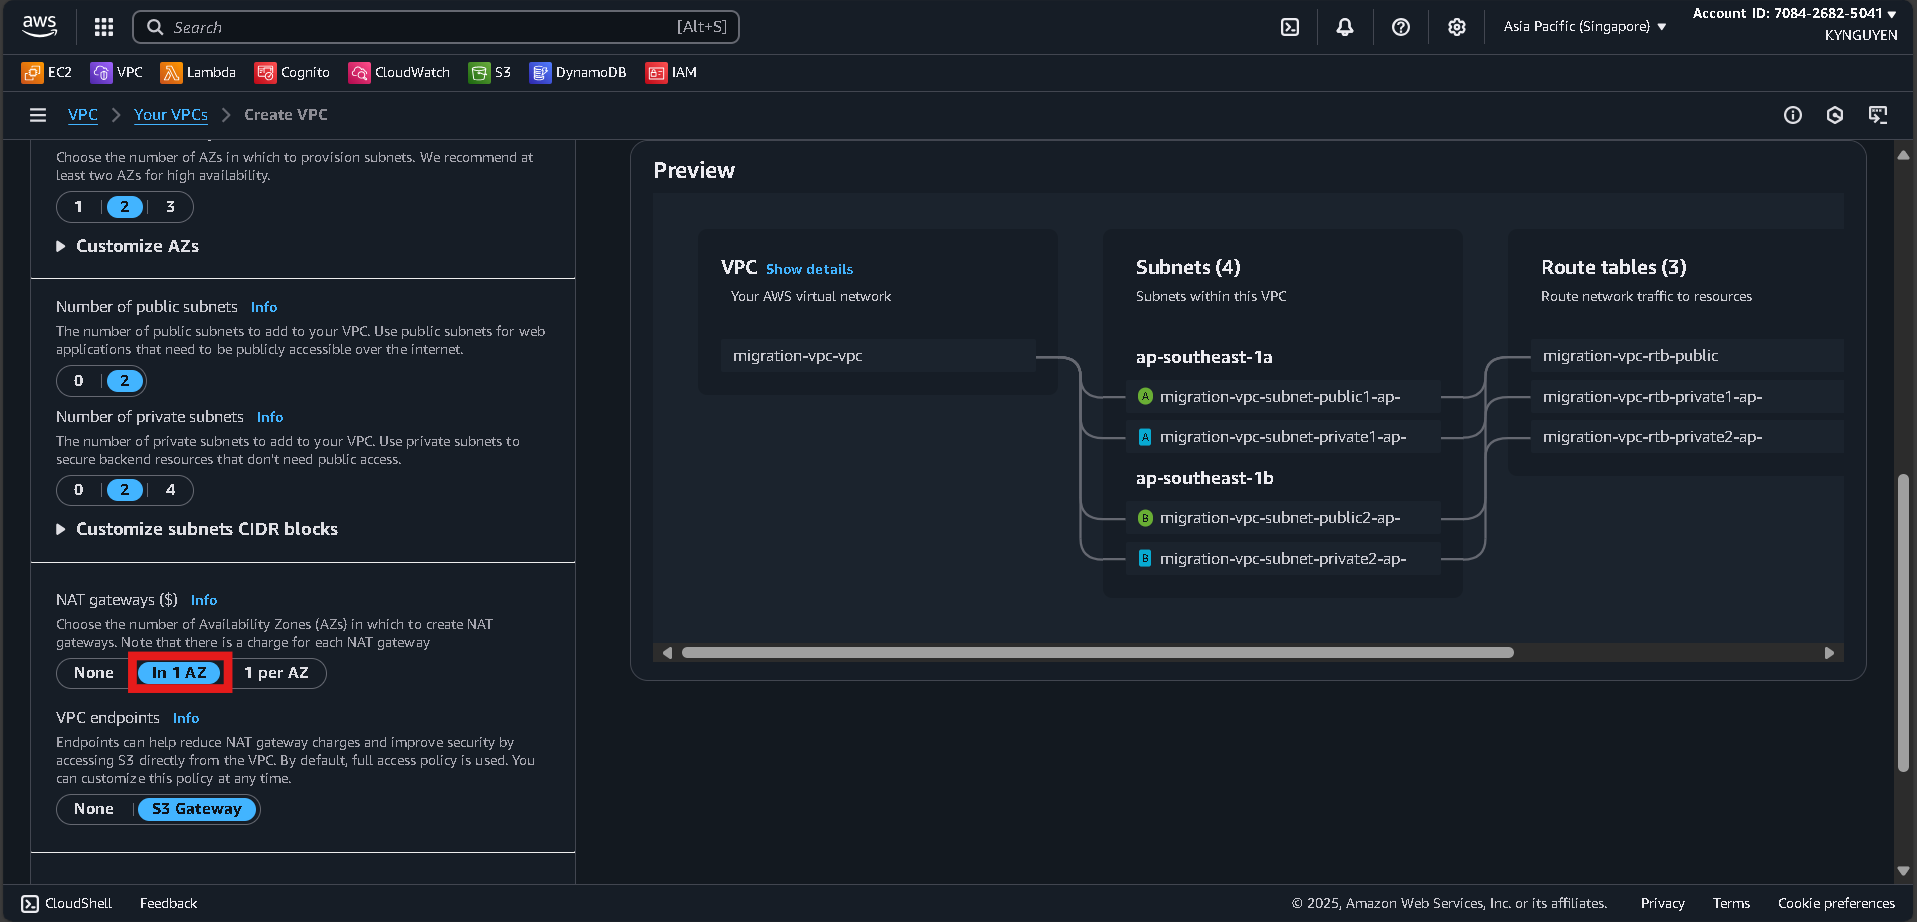
2 - NAT gateways:
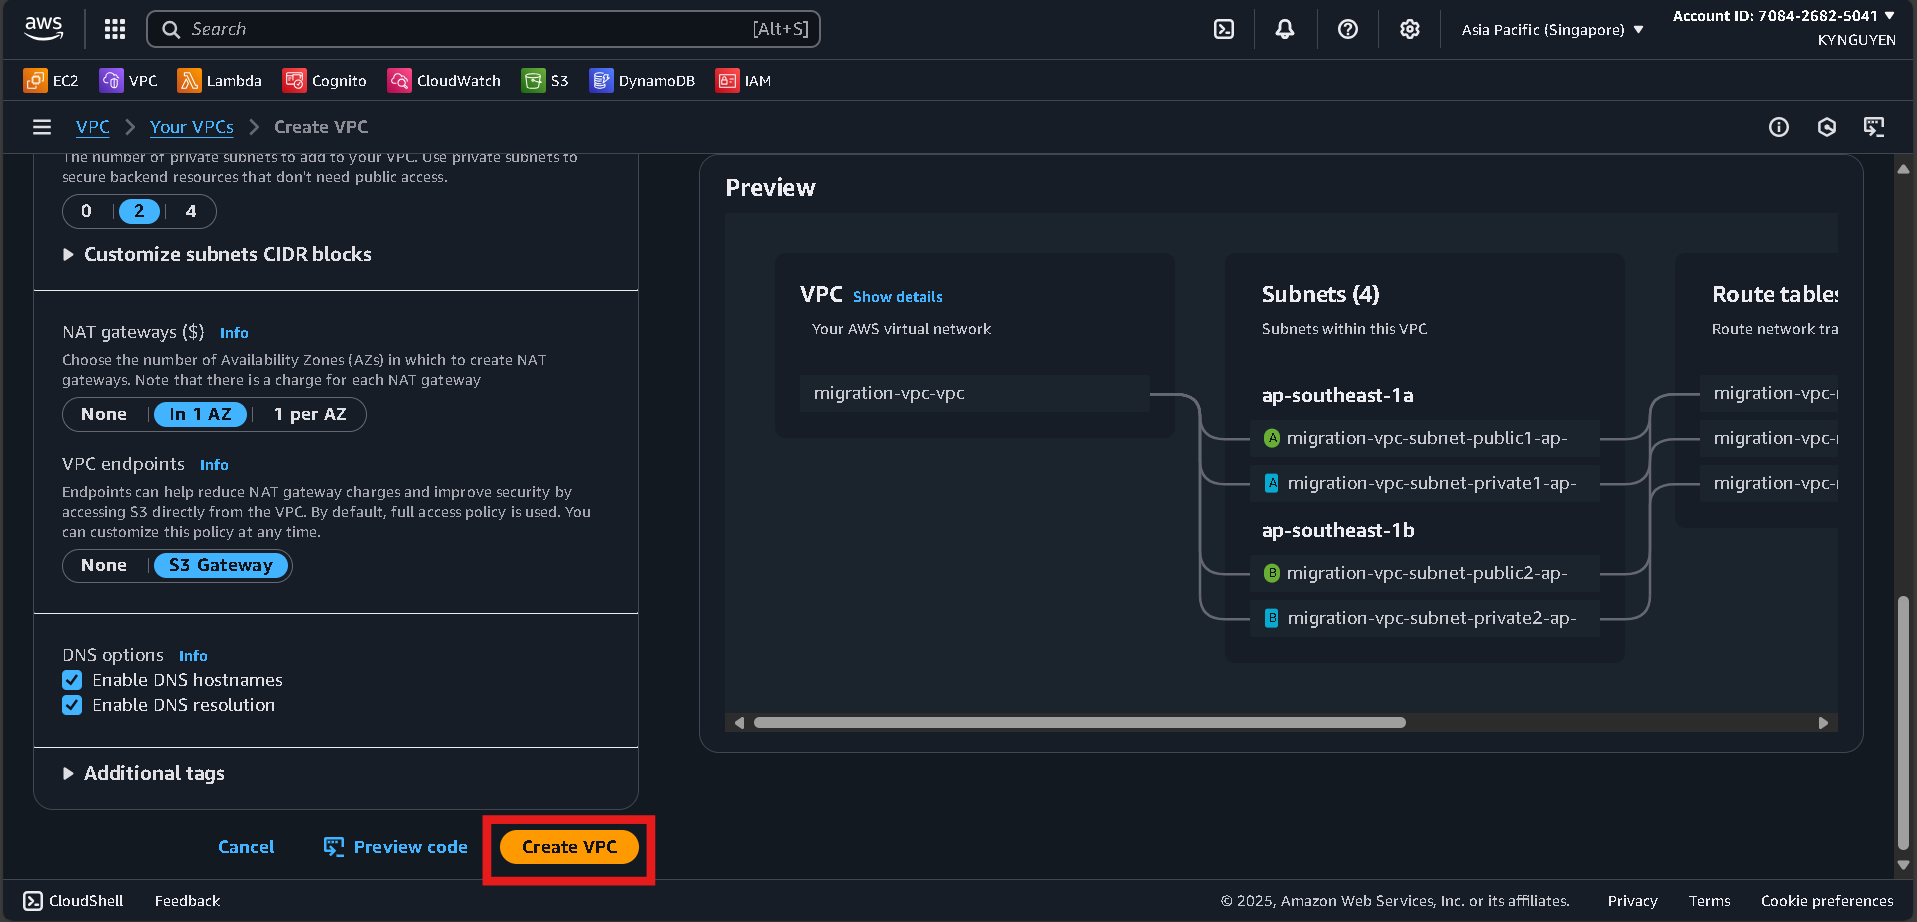
In 1 AZ - VPC endpoints:
None
- Name tag:
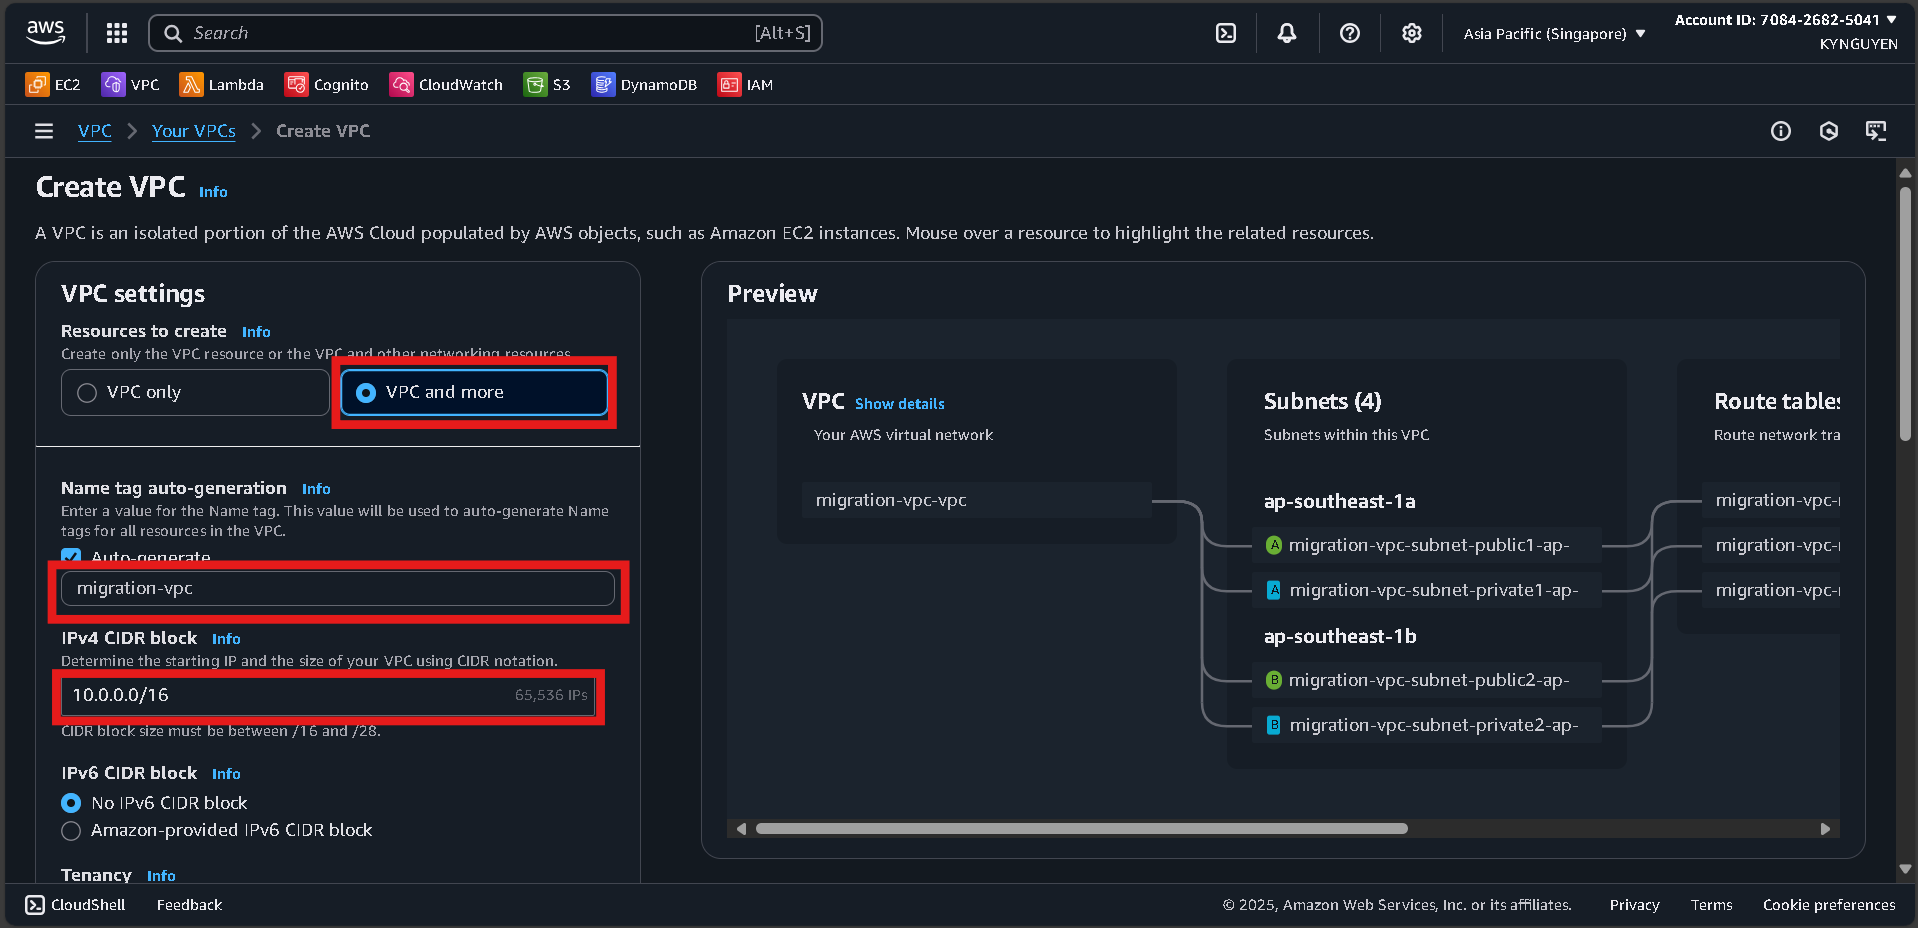
- Click Create VPC and wait ~5 minutes.
Notes
- VPC ID:
vpc-xxxxxxxxx - Public Subnet 1:
subnet-xxxxxxxxx - Public Subnet 2:
subnet-xxxxxxxxx - Private Subnet 1:
subnet-xxxxxxxxx - Private Subnet 2:
subnet-xxxxxxxxx
1.2 Create Security Group
Database Security Group
- In VPC Console, go to Security Groups → Create security group.
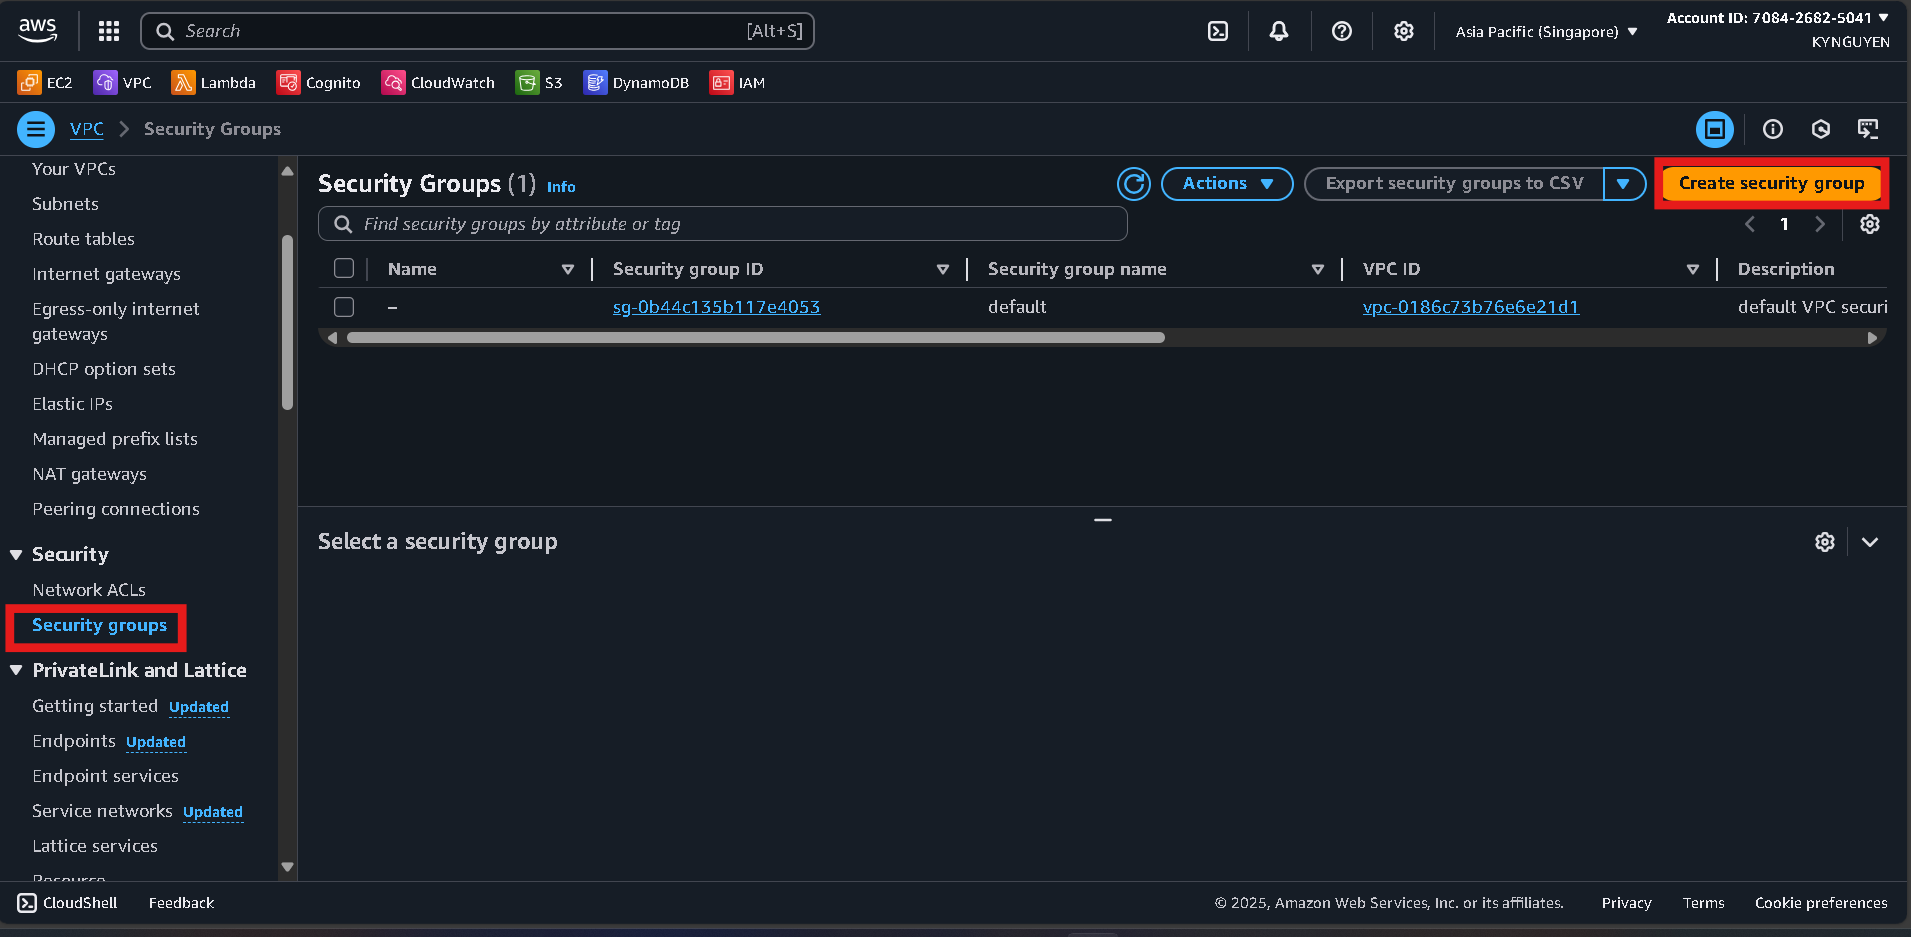
- Configure:
- Name:
db-migration-sg - Description: Security group for database migration
- VPC:
migration-vpc
- Name:
- Add inbound rules:
- MySQL/Aurora (3306) → Source:
10.0.0.0/16 - PostgreSQL (5432) → Source:
10.0.0.0/16
- MySQL/Aurora (3306) → Source:
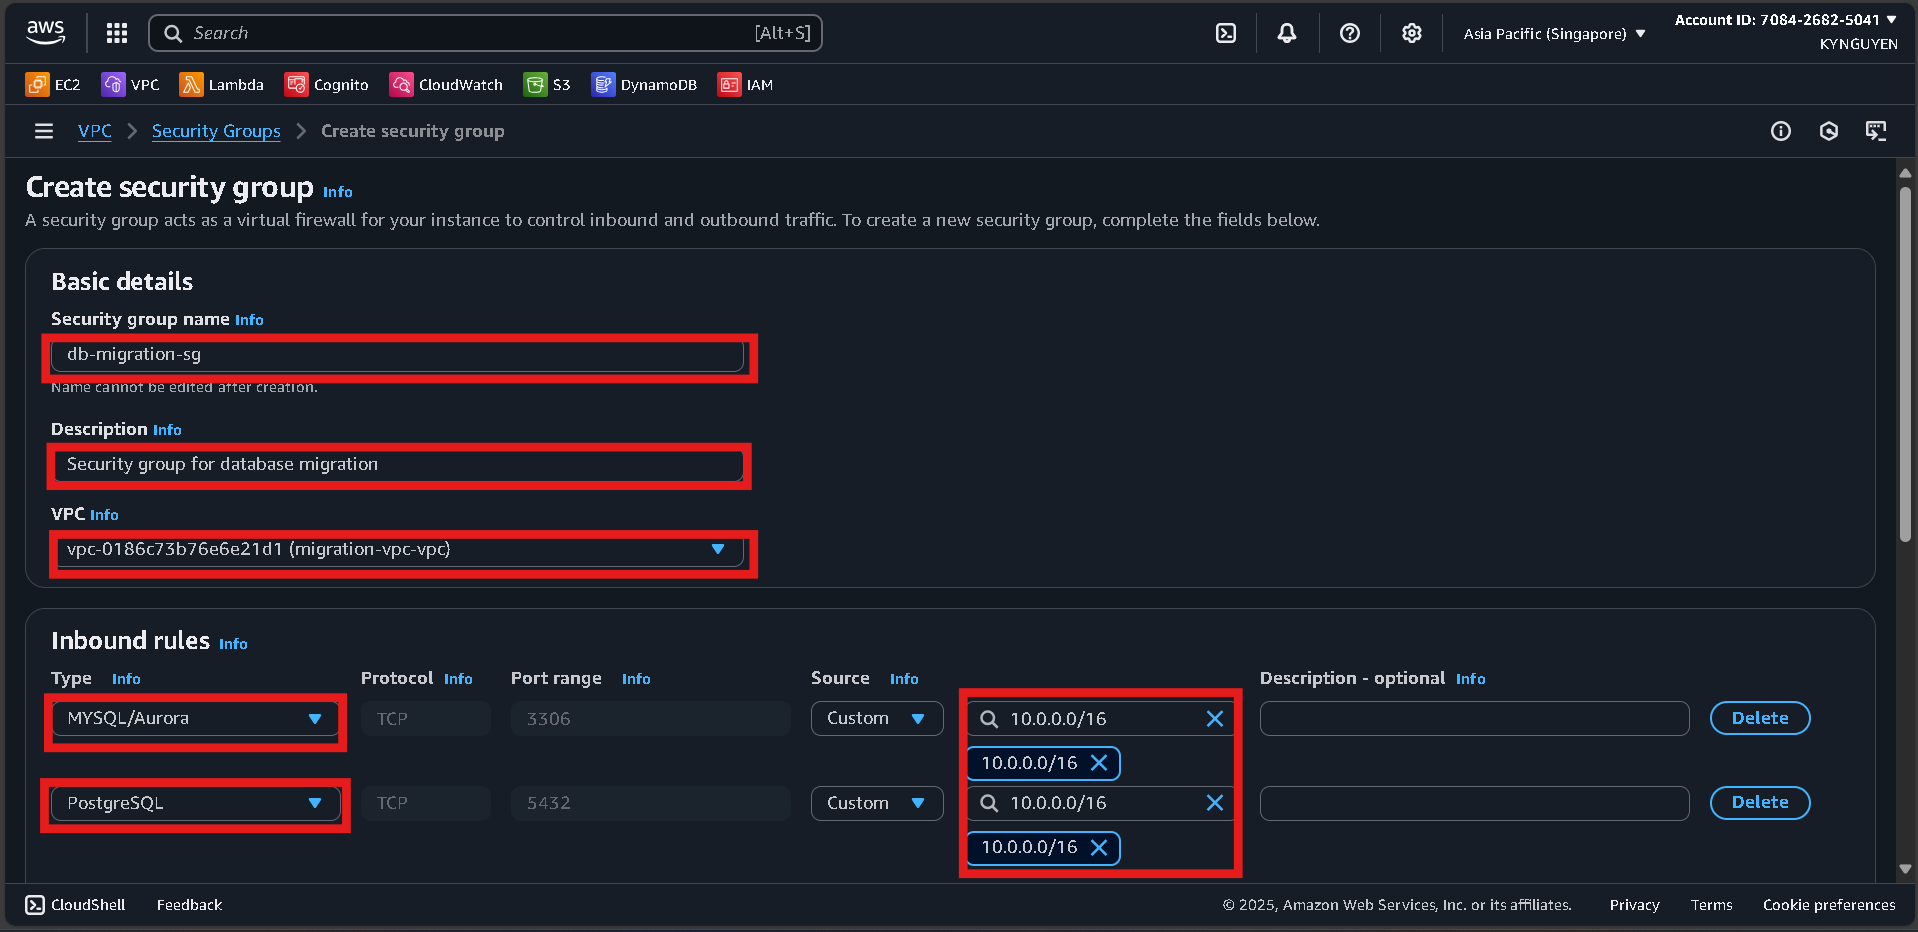
- Click Create security group.
DMS Security Group
- Click Create security group again.
- Configure:
- Name:
dms-replication-sg - Description: Security group for DMS replication instance
- VPC:
migration-vpc
- Name:
- Inbound rules: leave empty (DMS only needs outbound).
- Outbound rules: keep default (All traffic).
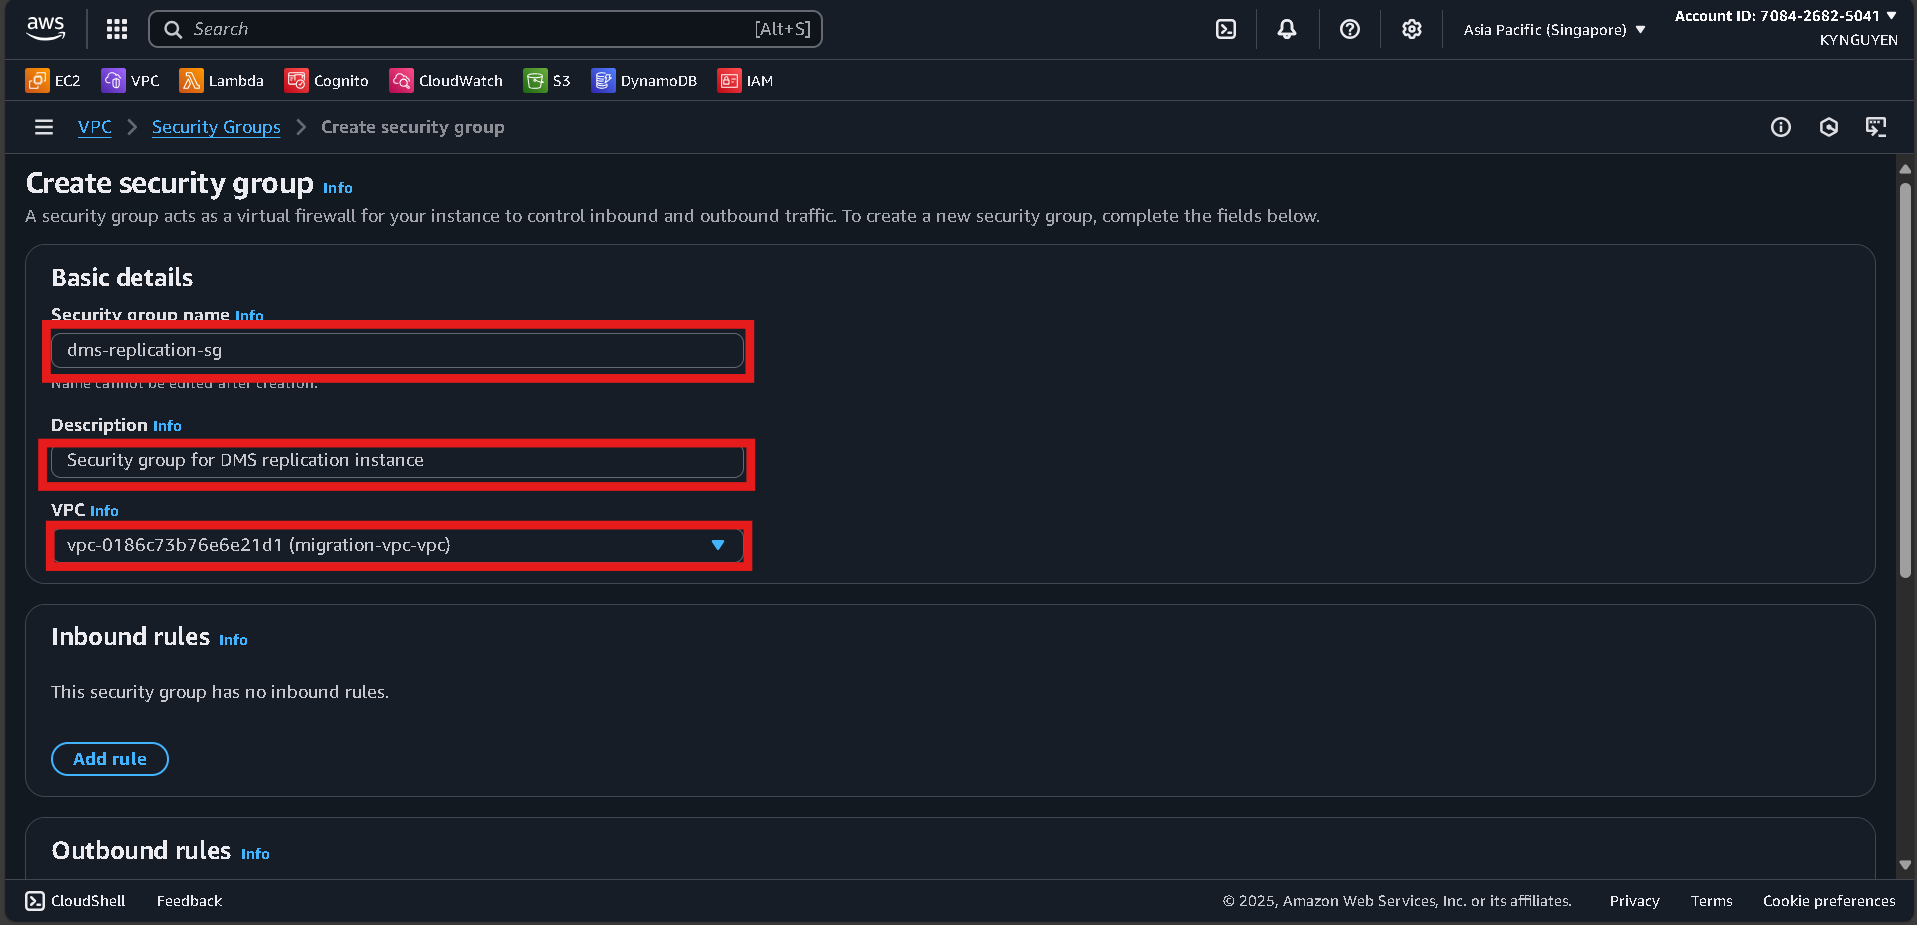
- Click Create security group.
Notes
- Database SG ID:
sg-xxxxxxxxx - DMS SG ID:
sg-xxxxxxxxx
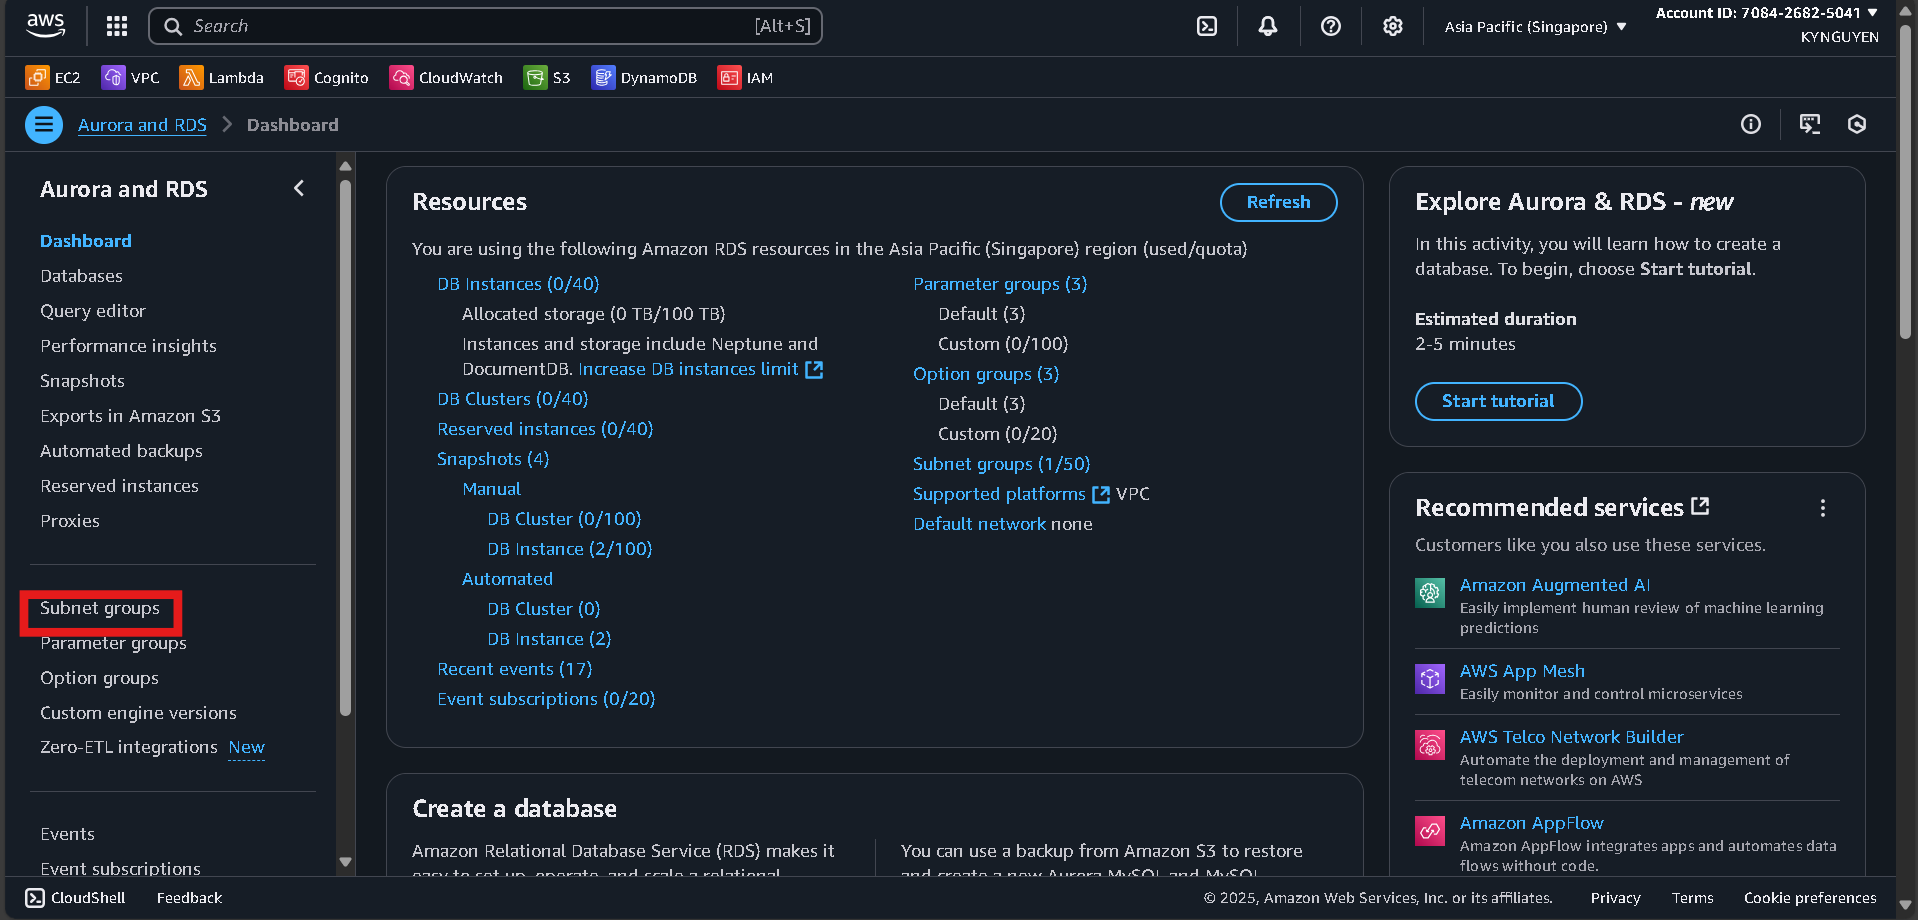
1.3 Create RDS Subnet Group
Access RDS Console
- Search for RDS in AWS Console.
- Go to Subnet groups in the left panel.
Create DB Subnet Group
- Click Create DB subnet group.
- Configure:
- Name:
migration-db-subnet-group - Description: Subnet group for migration databases
- VPC:
migration-vpc
- Name:
- Add subnets:
- Select 2 Availability Zones.
- Choose 2 private subnets created earlier.
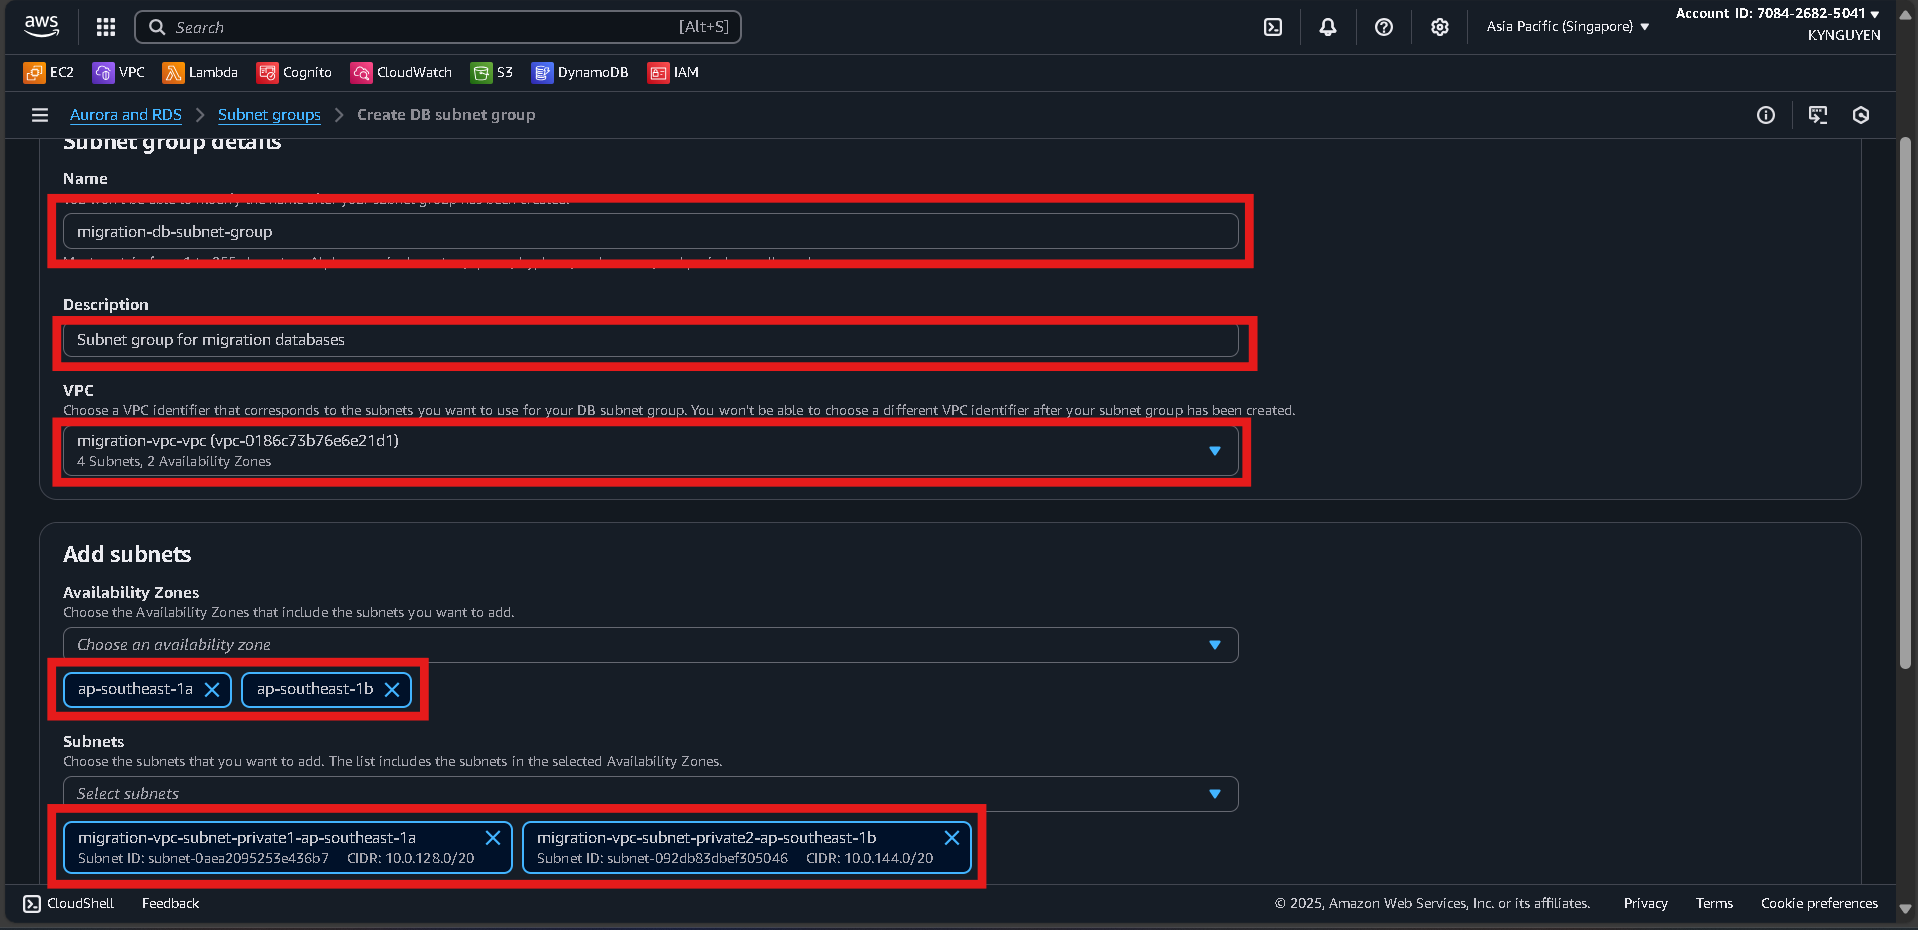
- Click Create.
Notes
- DB Subnet Group:
migration-db-subnet-group
1.4 Create DMS Subnet Group
Access RDS Console
- Search for RDS in AWS Console.
- Go to Subnet groups in the left panel.
Create DB Subnet Group
- Click Create DB subnet group.
- Configure:
- Name:
migration-db-subnet-group - Description: Subnet group for migration databases
- VPC:
migration-vpc
- Name:
- Add subnets:
- Select 2 Availability Zones.
- Choose 2 private subnets created earlier.
- Click Create.
Notes
- DB Subnet Group:
migration-db-subnet-group
1.5 Source & Target Databases Setup
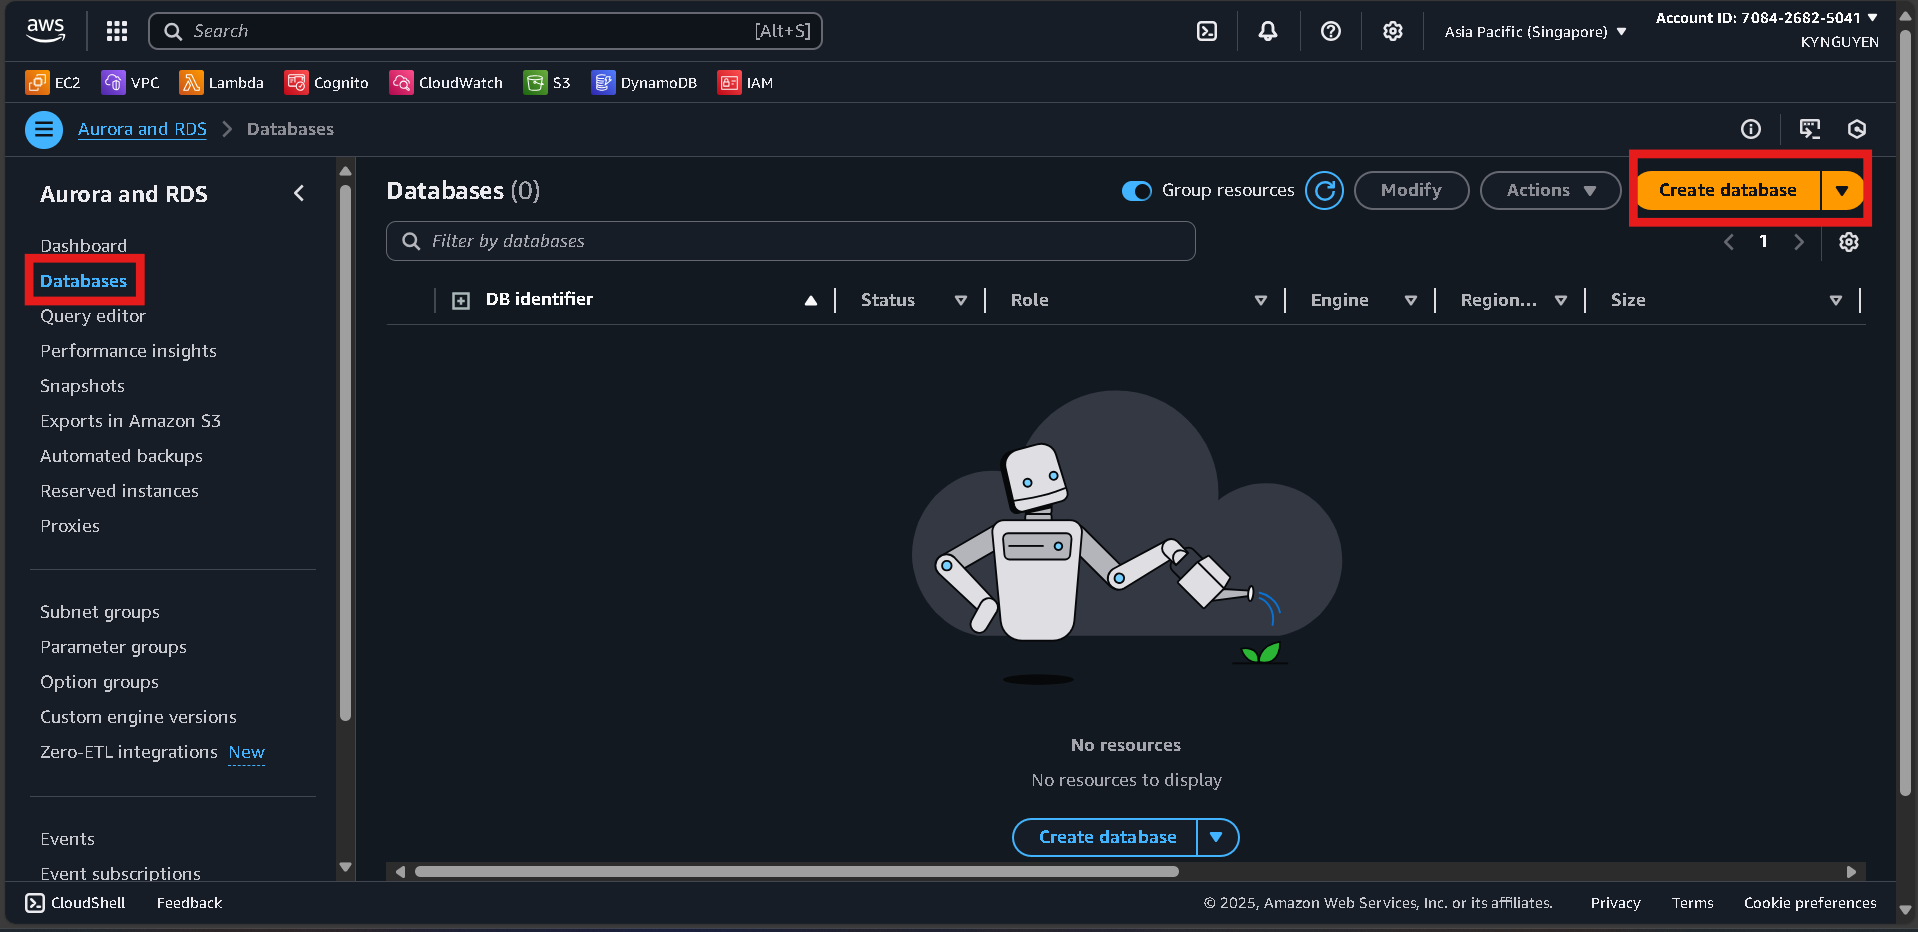
Access RDS Console
- Go to RDS Console → Click Create database.
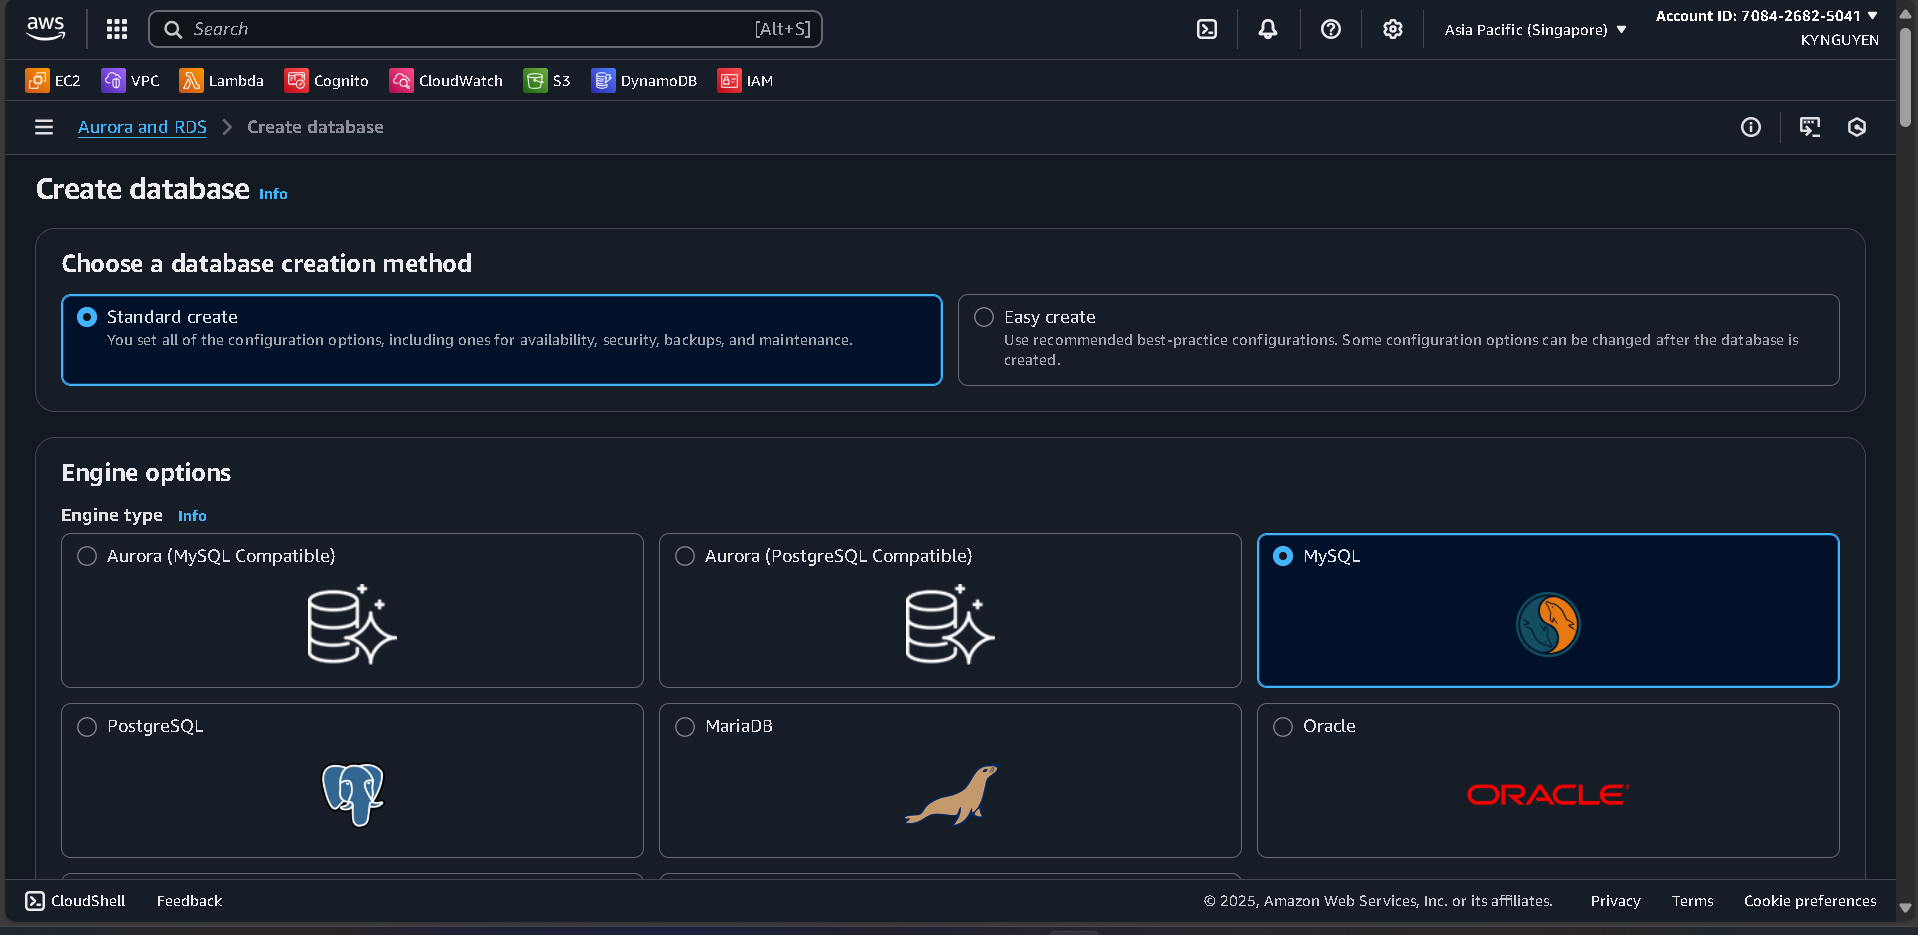
Database Configuration
- Database creation method: Standard create
- Engine: MySQL
- Version: (latest)
- Template: Free tier
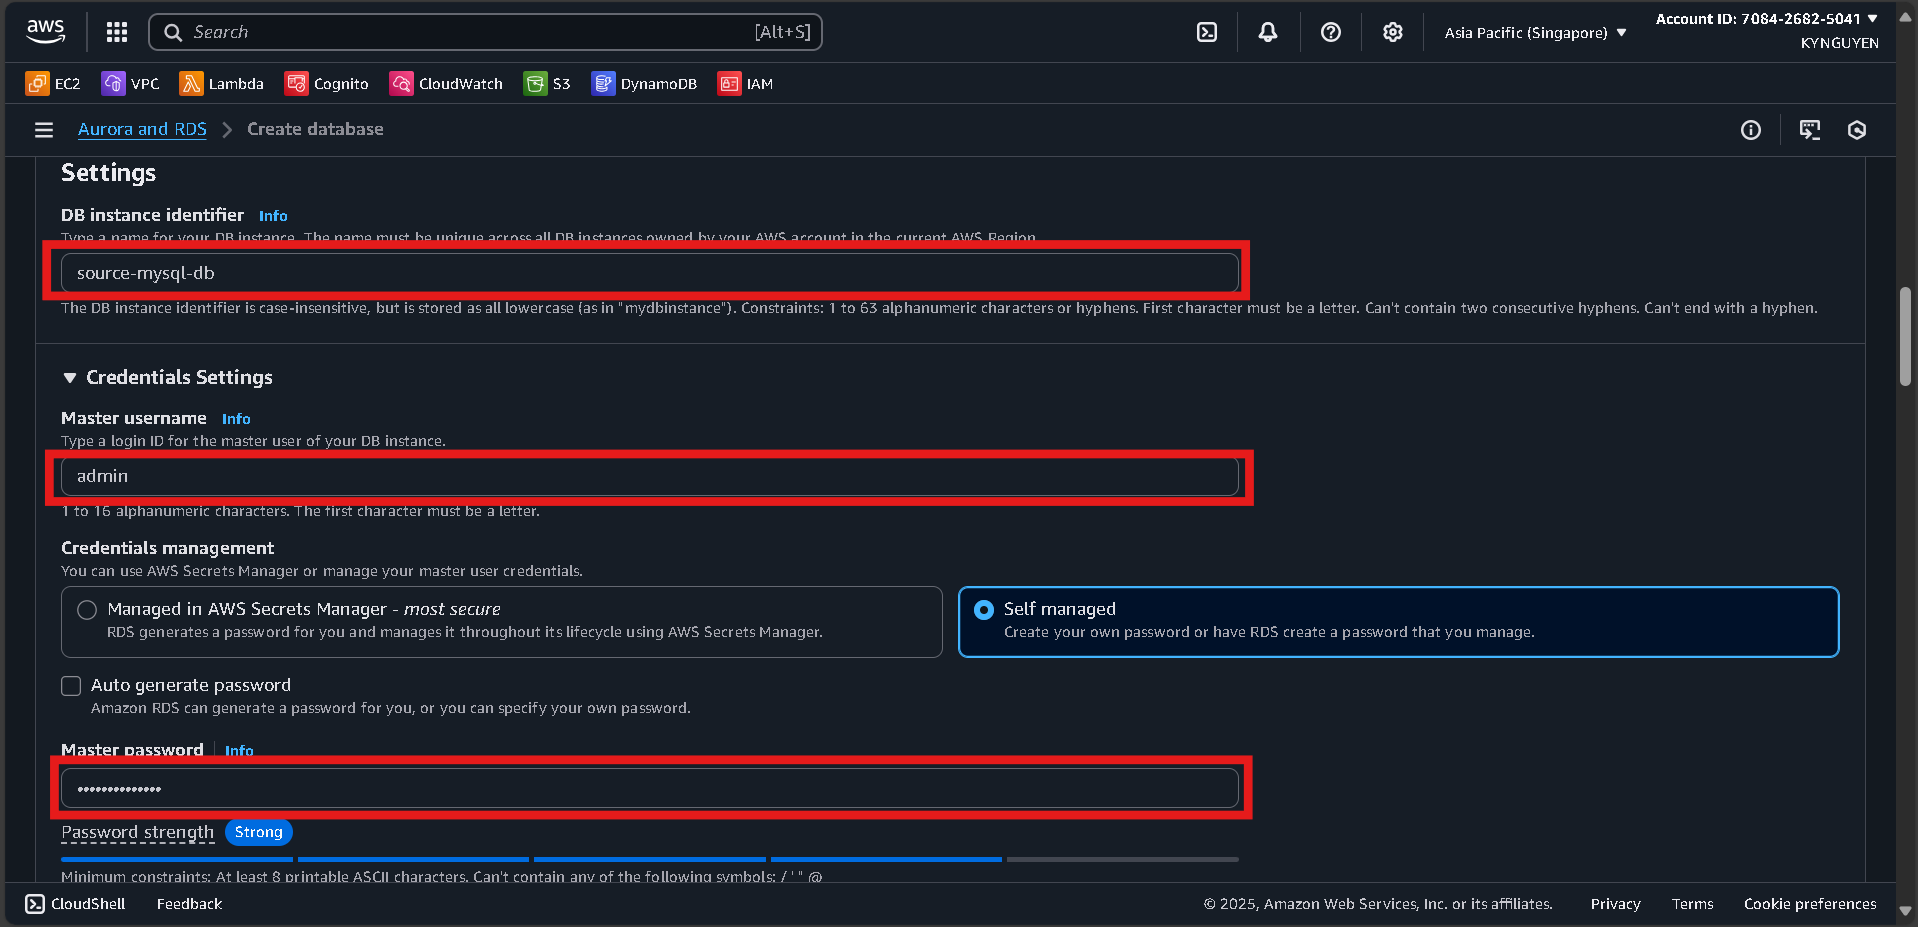
Settings
- DB instance identifier:
source-mysql-db - Master username:
admin - Password:
MyPassword123!
Instance Configuration
- DB instance class:
db.t3.micro(Free tier eligible)
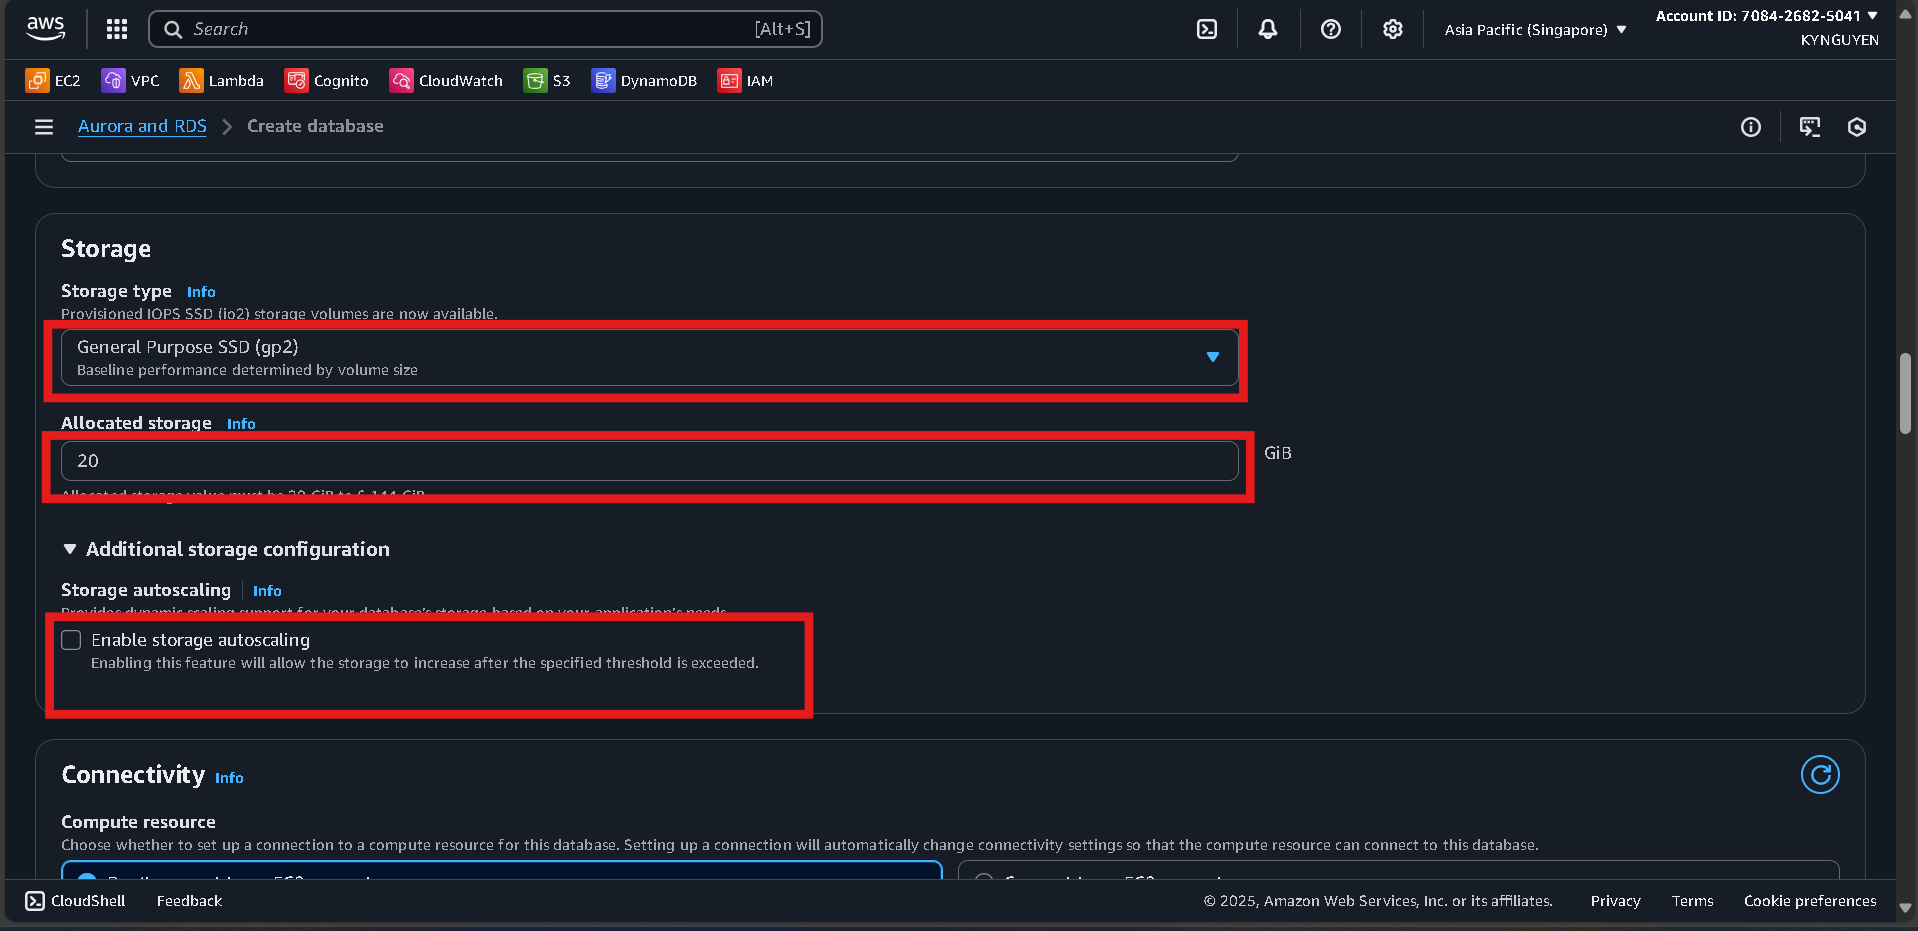
Storage
- Storage type: General Purpose SSD (gp2)
- Allocated storage: 20 GiB
- Disable storage autoscaling
Connectivity
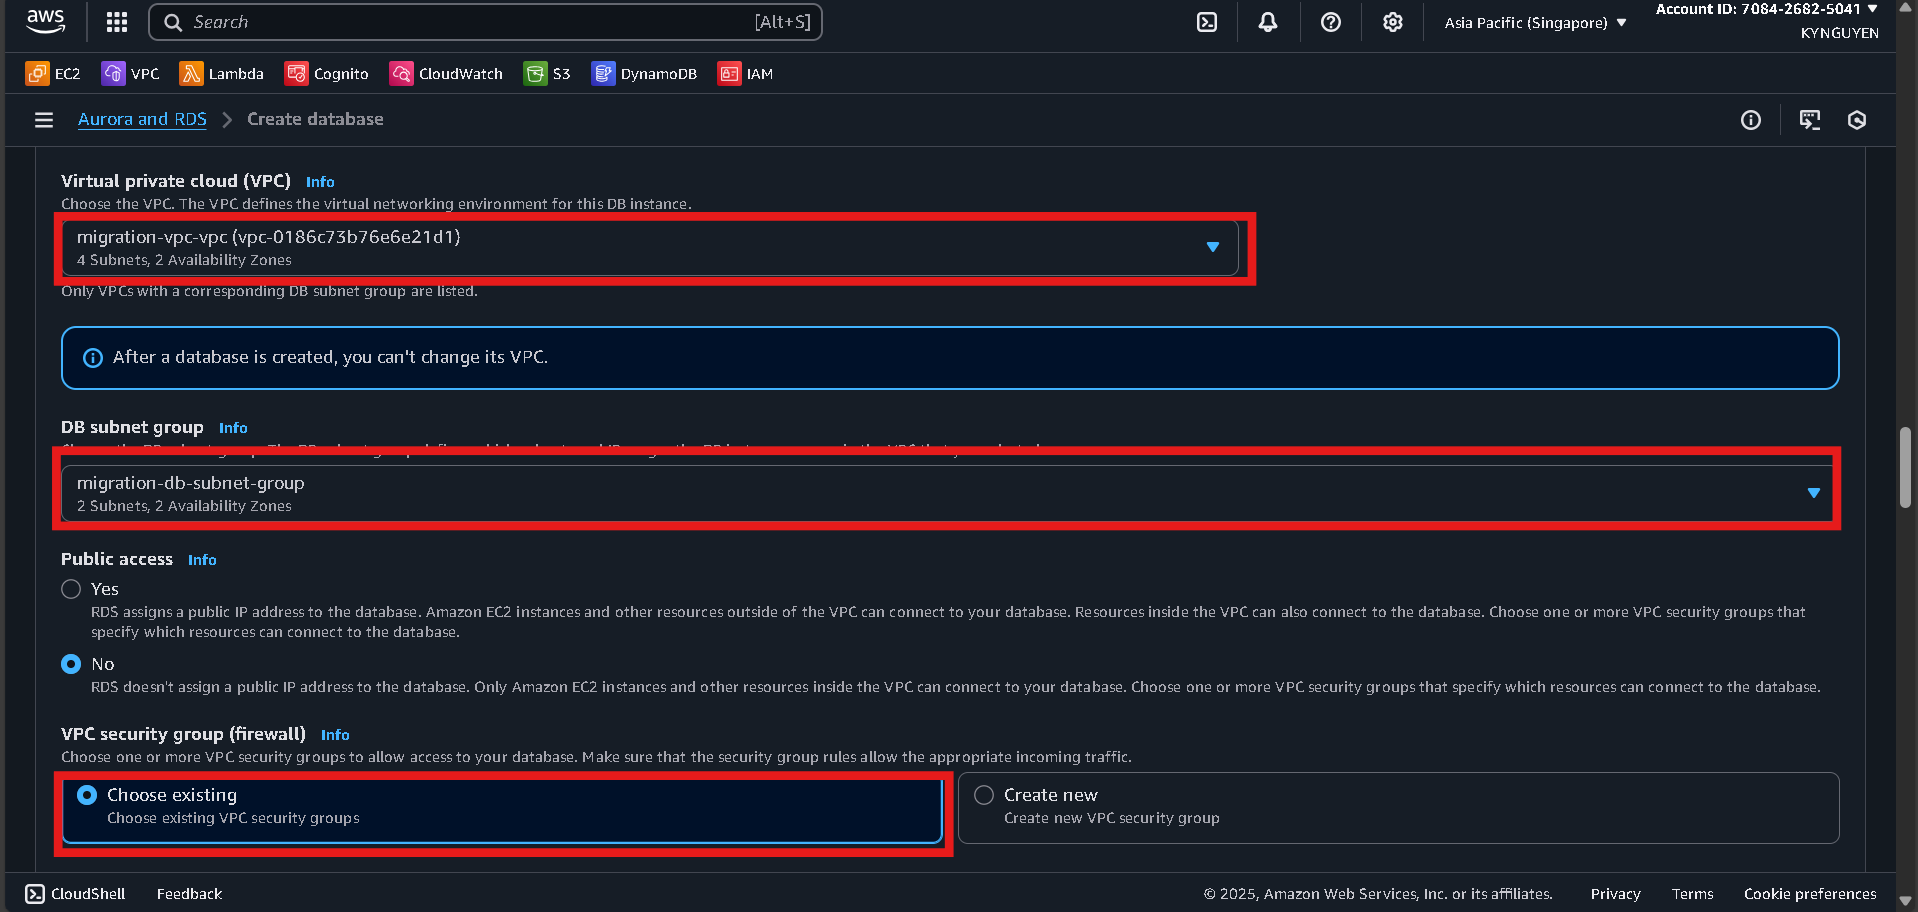
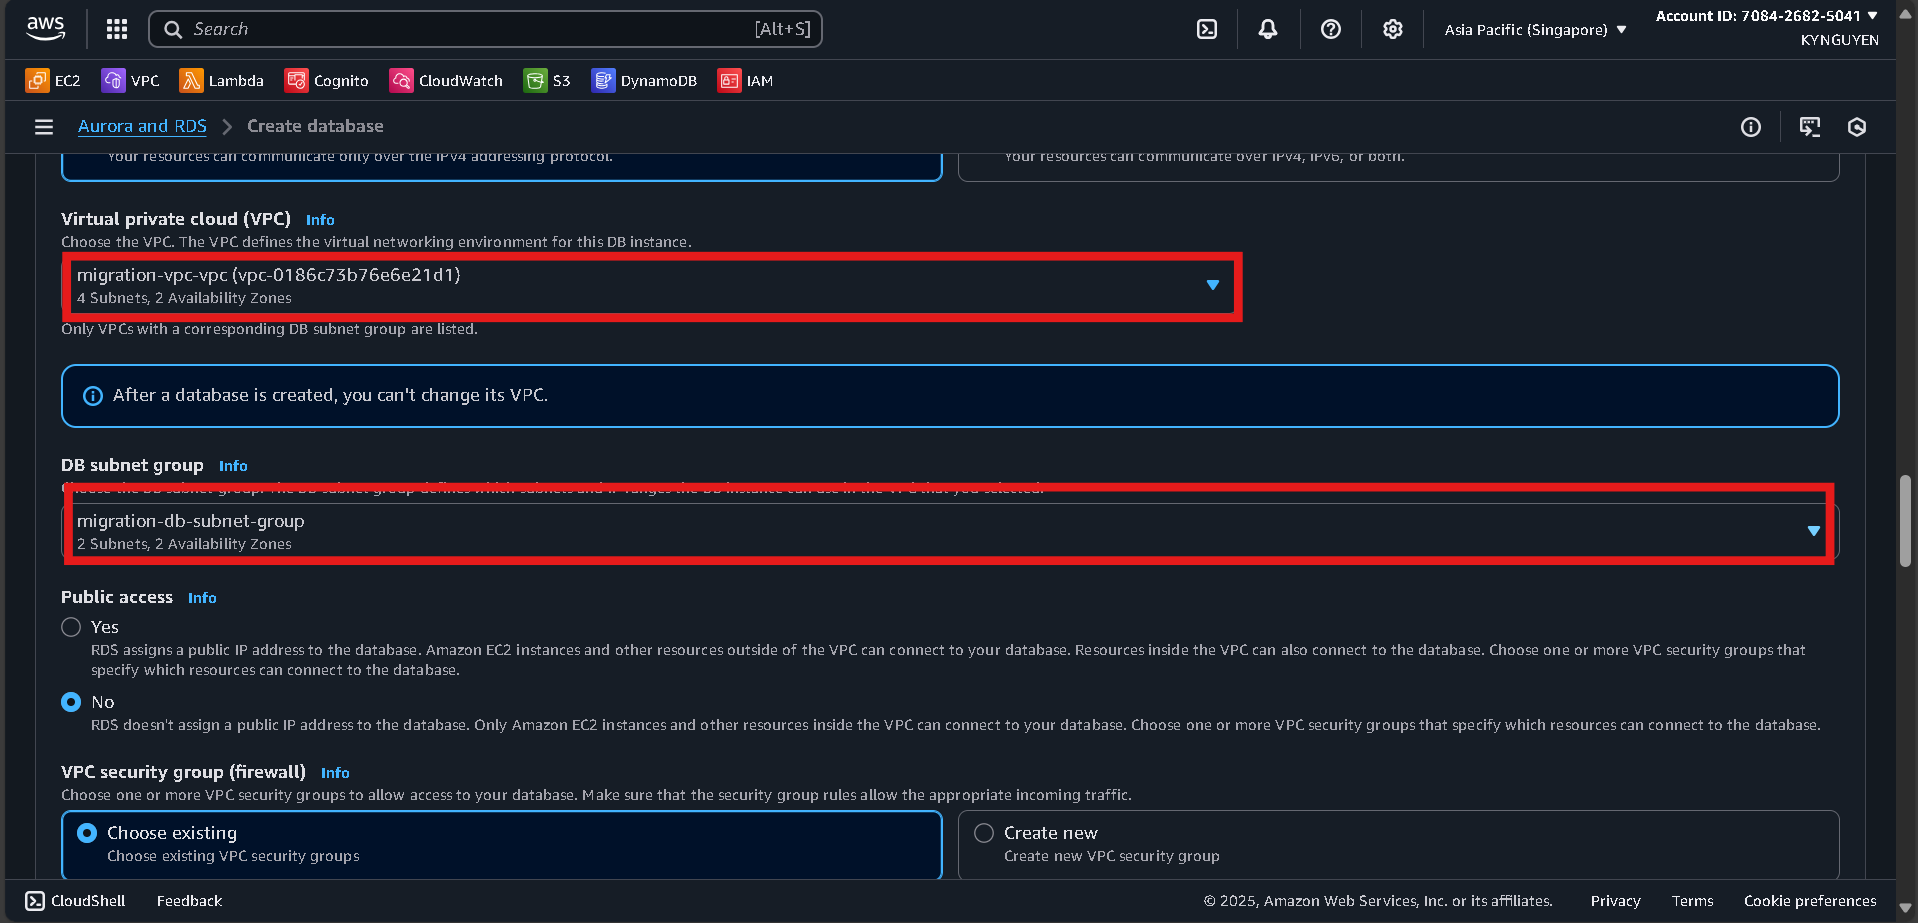
- VPC:
migration-vpc - DB subnet group:
migration-db-subnet-group - Public access: No
- Security group:
db-migration-sg
Additional Configuration
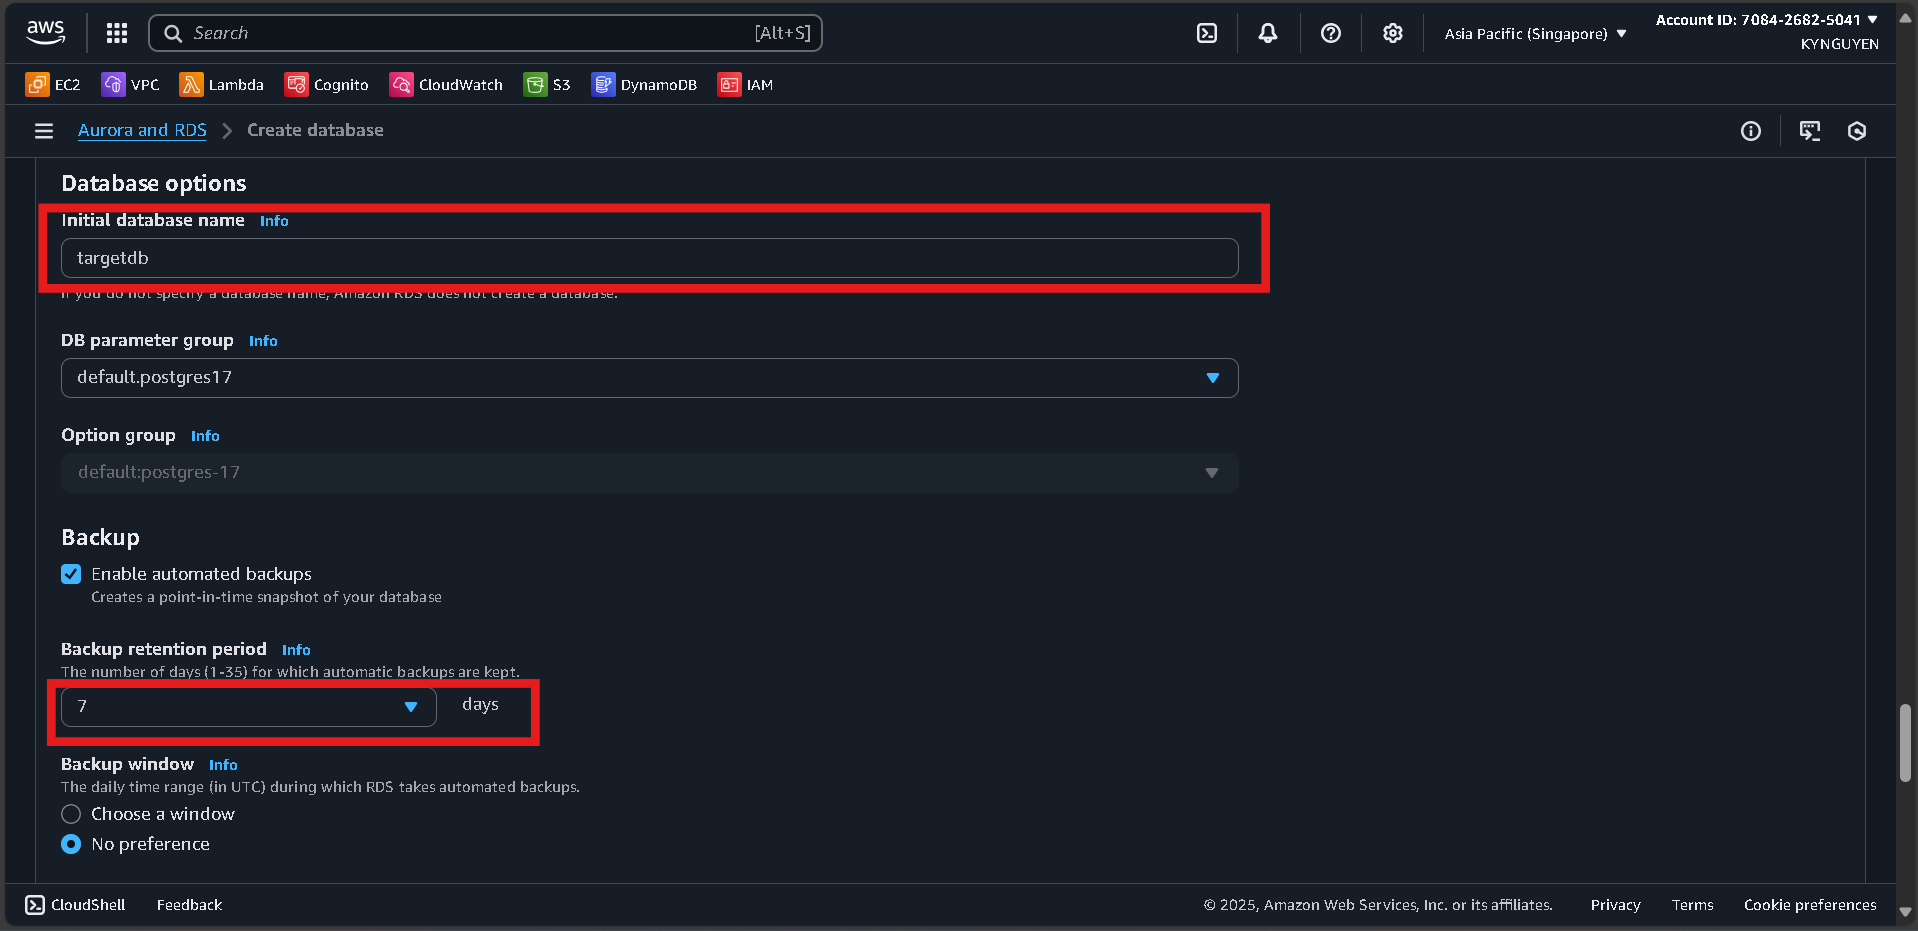
- Initial database name:
sampledb - Backup retention: 7 days
- Enhanced monitoring: No

Click “Create database” and wait ~10 minutes.
📝 Notes:
- Source DB Identifier:
source-mysql-db - Endpoint: (available after creation)
- Username:
admin - Password:
MyPassword123!
Create Target Database (PostgreSQL)
Create PostgreSQL Database
- In RDS Console, click Create database.
Database Configuration
- Engine: PostgreSQL
- Version: (latest)
- Template: Free tier
Settings
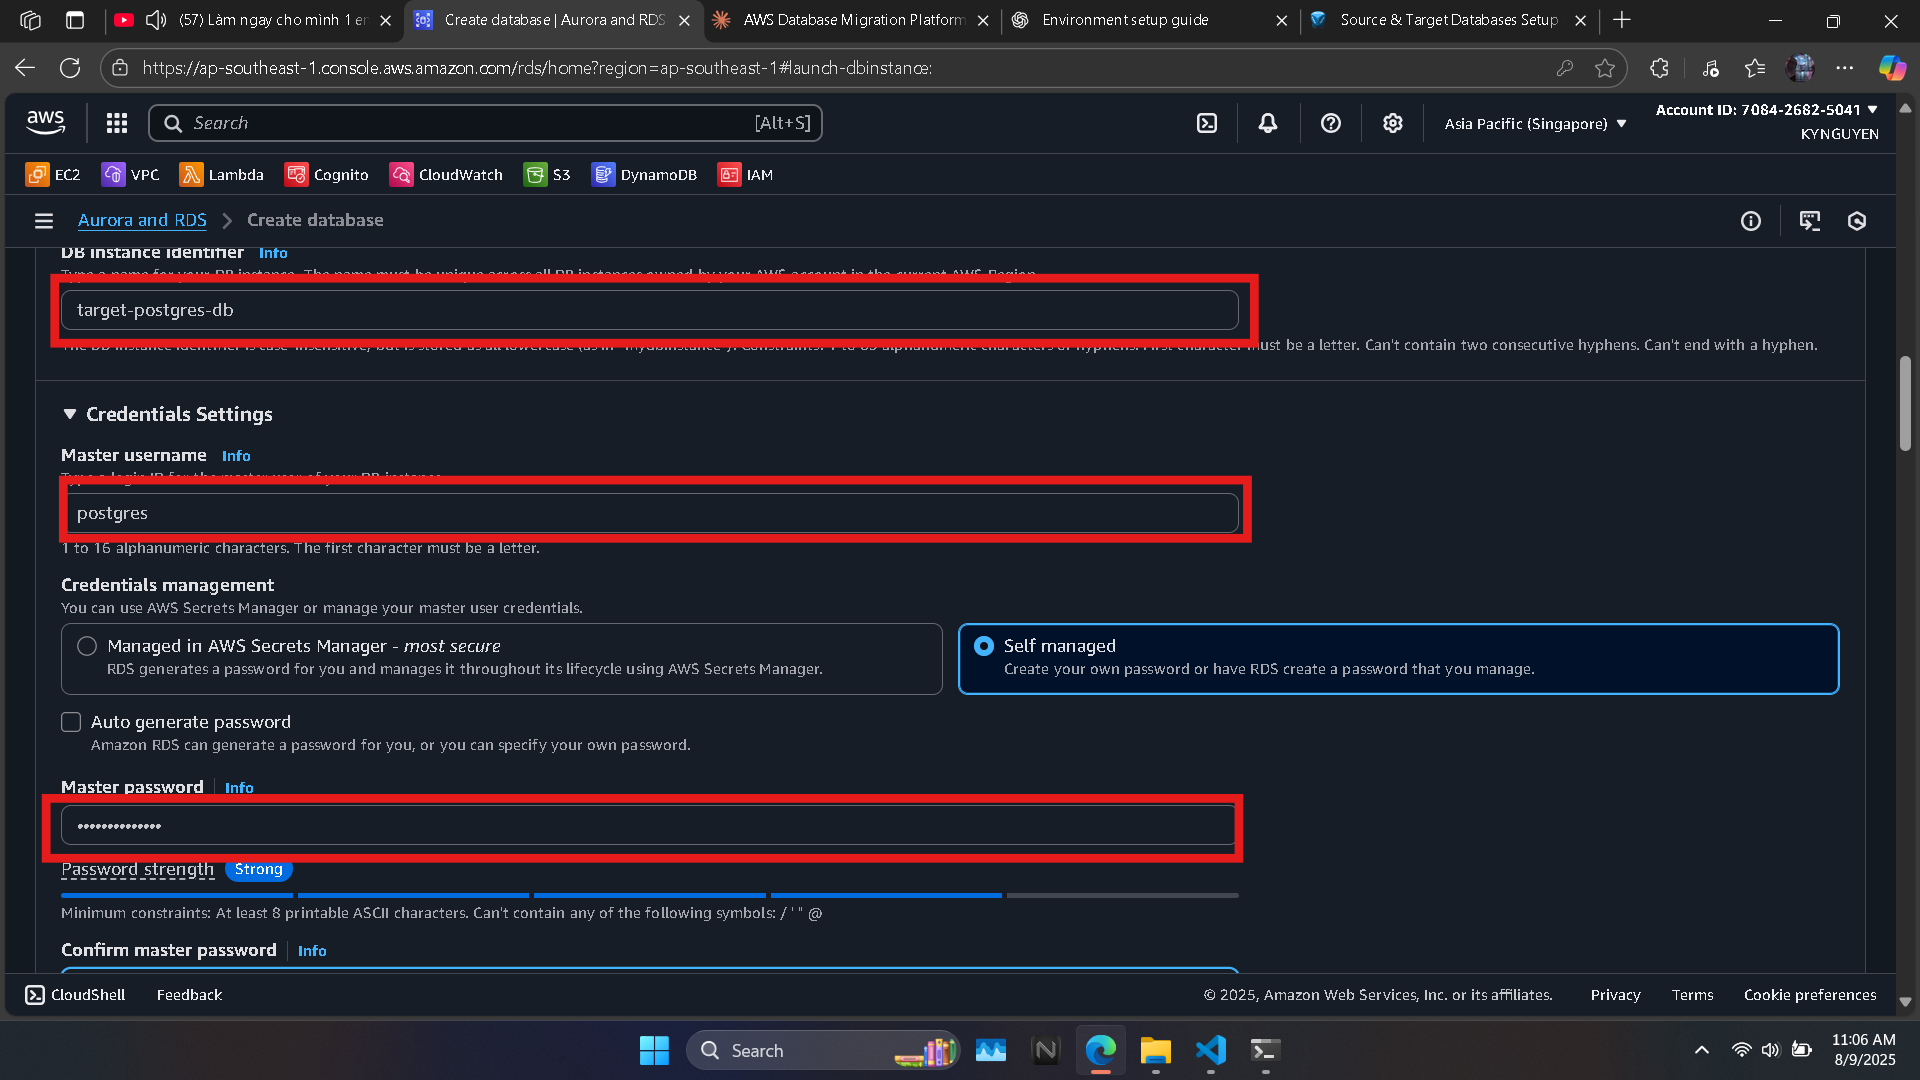
- DB instance identifier:
target-postgres-db - Master username:
postgres - Password:
MyPassword123!
Instance Configuration
- DB instance class:
db.t3.micro
Storage
- Storage type: General Purpose SSD (gp2)
- Allocated storage: 20 GiB
Connectivity
- VPC:
migration-vpc - DB subnet group:
migration-db-subnet-group - Public access: No
- Security group:
db-migration-sg
Additional Configuration
- Initial database name:
targetdb
Click “Create database” and wait ~10 minutes.
📝 Notes:
- Target DB Identifier:
target-postgres-db - Endpoint: (available after creation)
- Username:
postgres - Password:
MyPassword123!
1.6 Launch EC2 Bastion Host
Launch EC2 Instance for Database Access (Bastion Host)
Step 1: Access EC2 Console
- Search for EC2 in the AWS Console search bar.
- Click Launch instances.
Step 2: Configure EC2 Instance
- Name:
migration-bastion - AMI: Amazon Linux 2023
- Instance type:
t2.micro - Key pair: Create a new key pair → Name:
migration-key→ Download the.pemfile.
Step 3: Network Settings
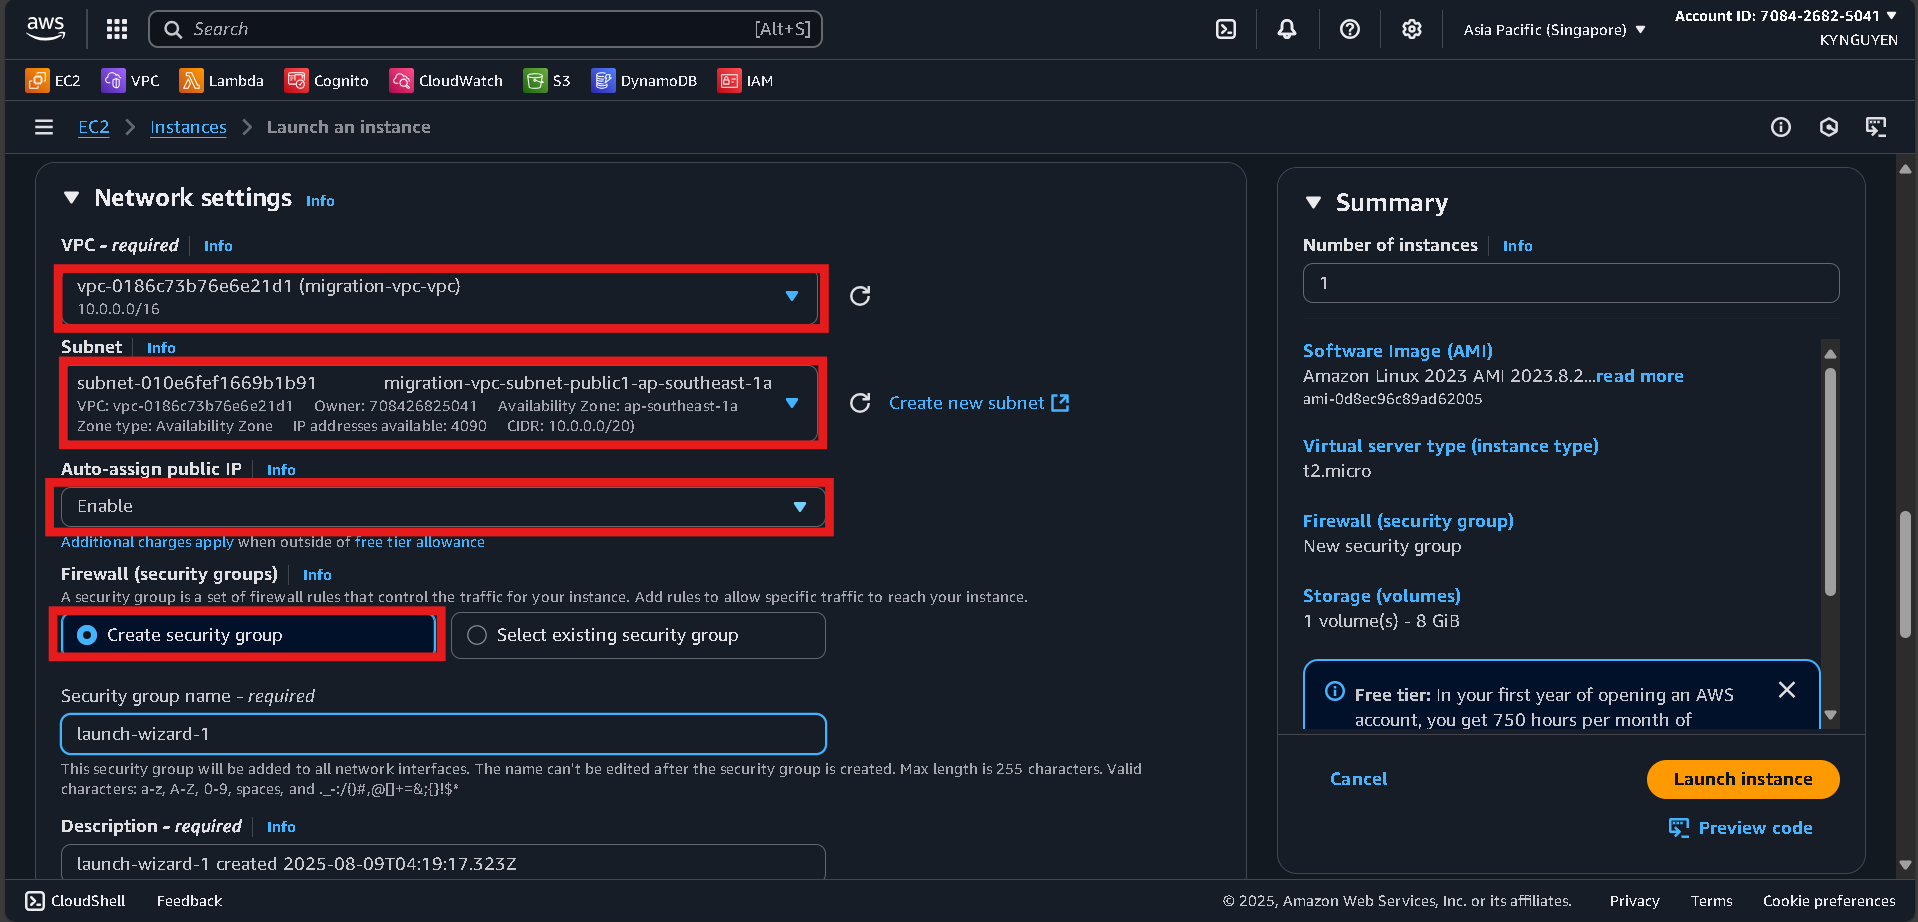
-
VPC:
migration-vpc -
Subnet: Select a Public subnet (choose either Public Subnet 1 or 2).
-
Auto-assign public IP: Enable
-
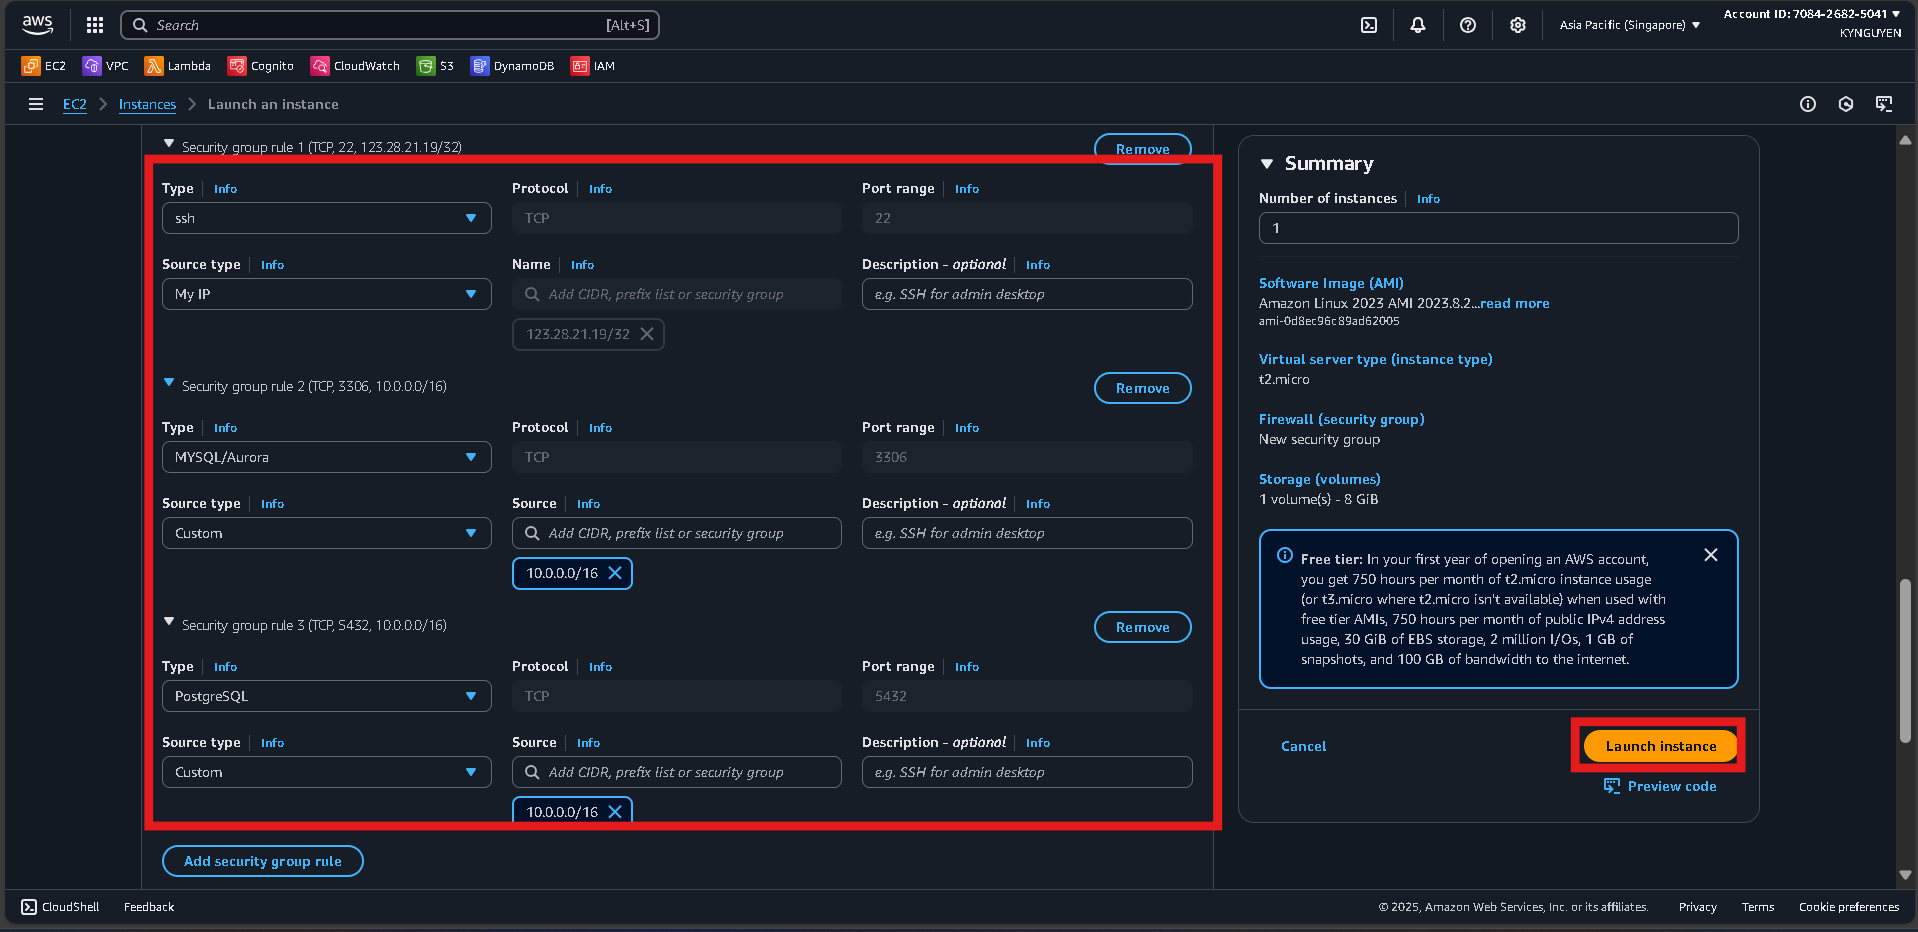
Security group: Create new
- SSH (22): Source = My IP
- MySQL (3306): Source = VPC CIDR (
10.0.0.0/16) - PostgreSQL (5432): Source = VPC CIDR (
10.0.0.0/16)
Step 4: Launch
- Click Launch instance and wait for the instance to become running.
1.7 Connect and Setup Sample Data
Connect to EC2 and Setup Sample Data
Step 1: Connect to EC2 Instance
- Wait for the EC2 instance to be in Running state.
- Copy Public IPV4 address
- Open your cmd or Powershell
- Move to folder have file migration-key.pem
cd C:\path\to\your\key\
- Run this command
ssh -i migration-key.pem ec2-user@[Public IPV4]
Step 2: Install MySQL Client
sudo yum update -y
sudo dnf install mariadb105
Step3: Create Sample Data in MySQL Connect to the MySQL database:
mysql -h [SOURCE-MYSQL-ENDPOINT] -u admin -p
# Enter password: MyPassword123!

Step4 Inside MySQL, create the sample tables and insert sample data:
USE sampledb;
CREATE TABLE employees (
id INT PRIMARY KEY AUTO_INCREMENT,
first_name VARCHAR(50),
last_name VARCHAR(50),
email VARCHAR(100),
department VARCHAR(50),
salary DECIMAL(10,2),
hire_date DATE
);
INSERT INTO employees VALUES
(1, 'John', 'Doe', 'john.doe@company.com', 'IT', 75000.00, '2022-01-15'),
(2, 'Jane', 'Smith', 'jane.smith@company.com', 'HR', 65000.00, '2022-02-20'),
(3, 'Mike', 'Johnson', 'mike.johnson@company.com', 'Finance', 80000.00, '2022-03-10'),
(4, 'Sarah', 'Wilson', 'sarah.wilson@company.com', 'IT', 78000.00, '2022-04-05'),
(5, 'David', 'Brown', 'david.brown@company.com', 'Marketing', 70000.00, '2022-05-12');
CREATE TABLE departments (
id INT PRIMARY KEY,
name VARCHAR(50),
manager_id INT,
budget DECIMAL(12,2)
);
INSERT INTO departments VALUES
(1, 'IT', 1, 500000.00),
(2, 'HR', 2, 300000.00),
(3, 'Finance', 3, 400000.00),
(4, 'Marketing', 5, 350000.00);
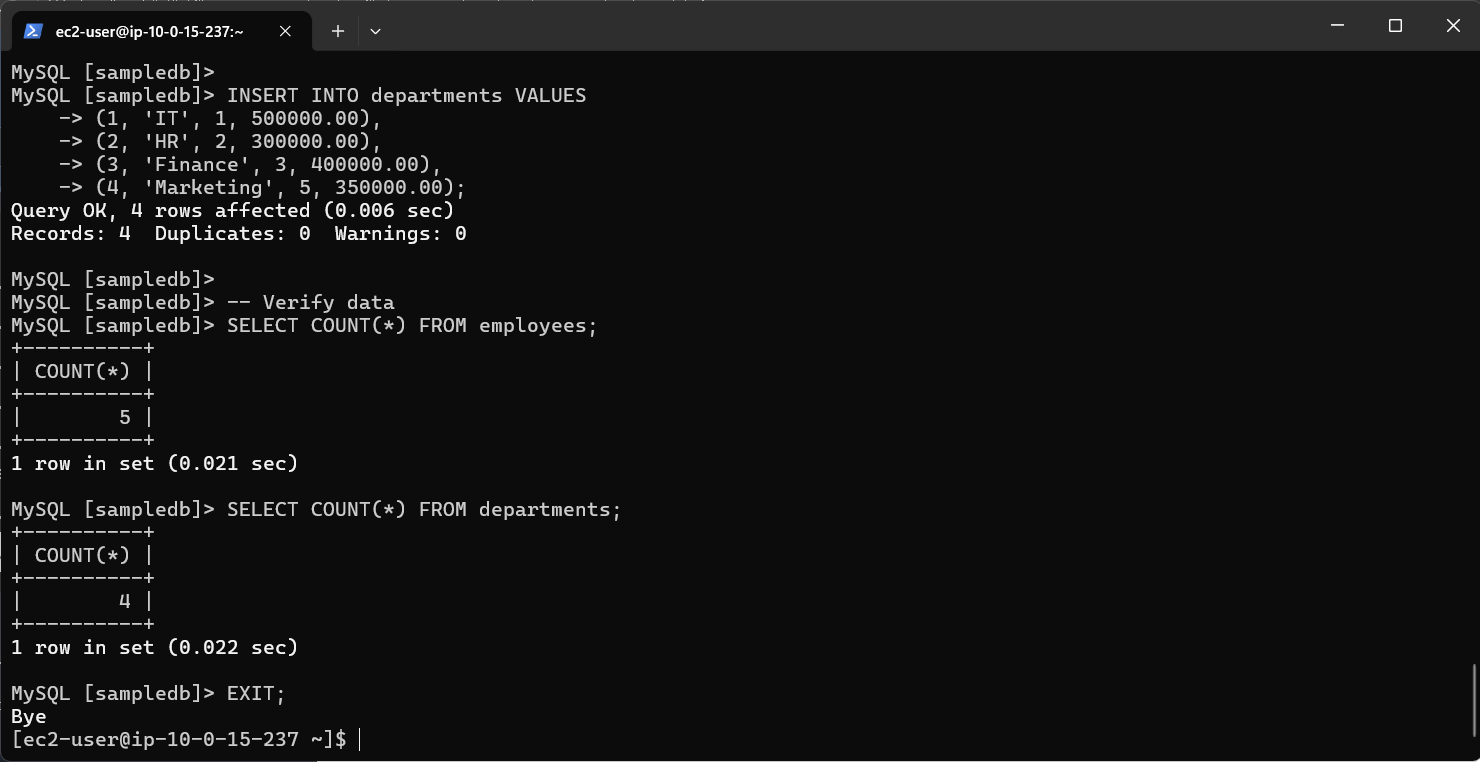
-- Verify data
SELECT COUNT(*) FROM employees;
SELECT COUNT(*) FROM departments;
Step5: Finally, exit MySQL:
EXIT;
1.8 Create DMS Replication Instance and Endpoints
Create DMS Replication Instance
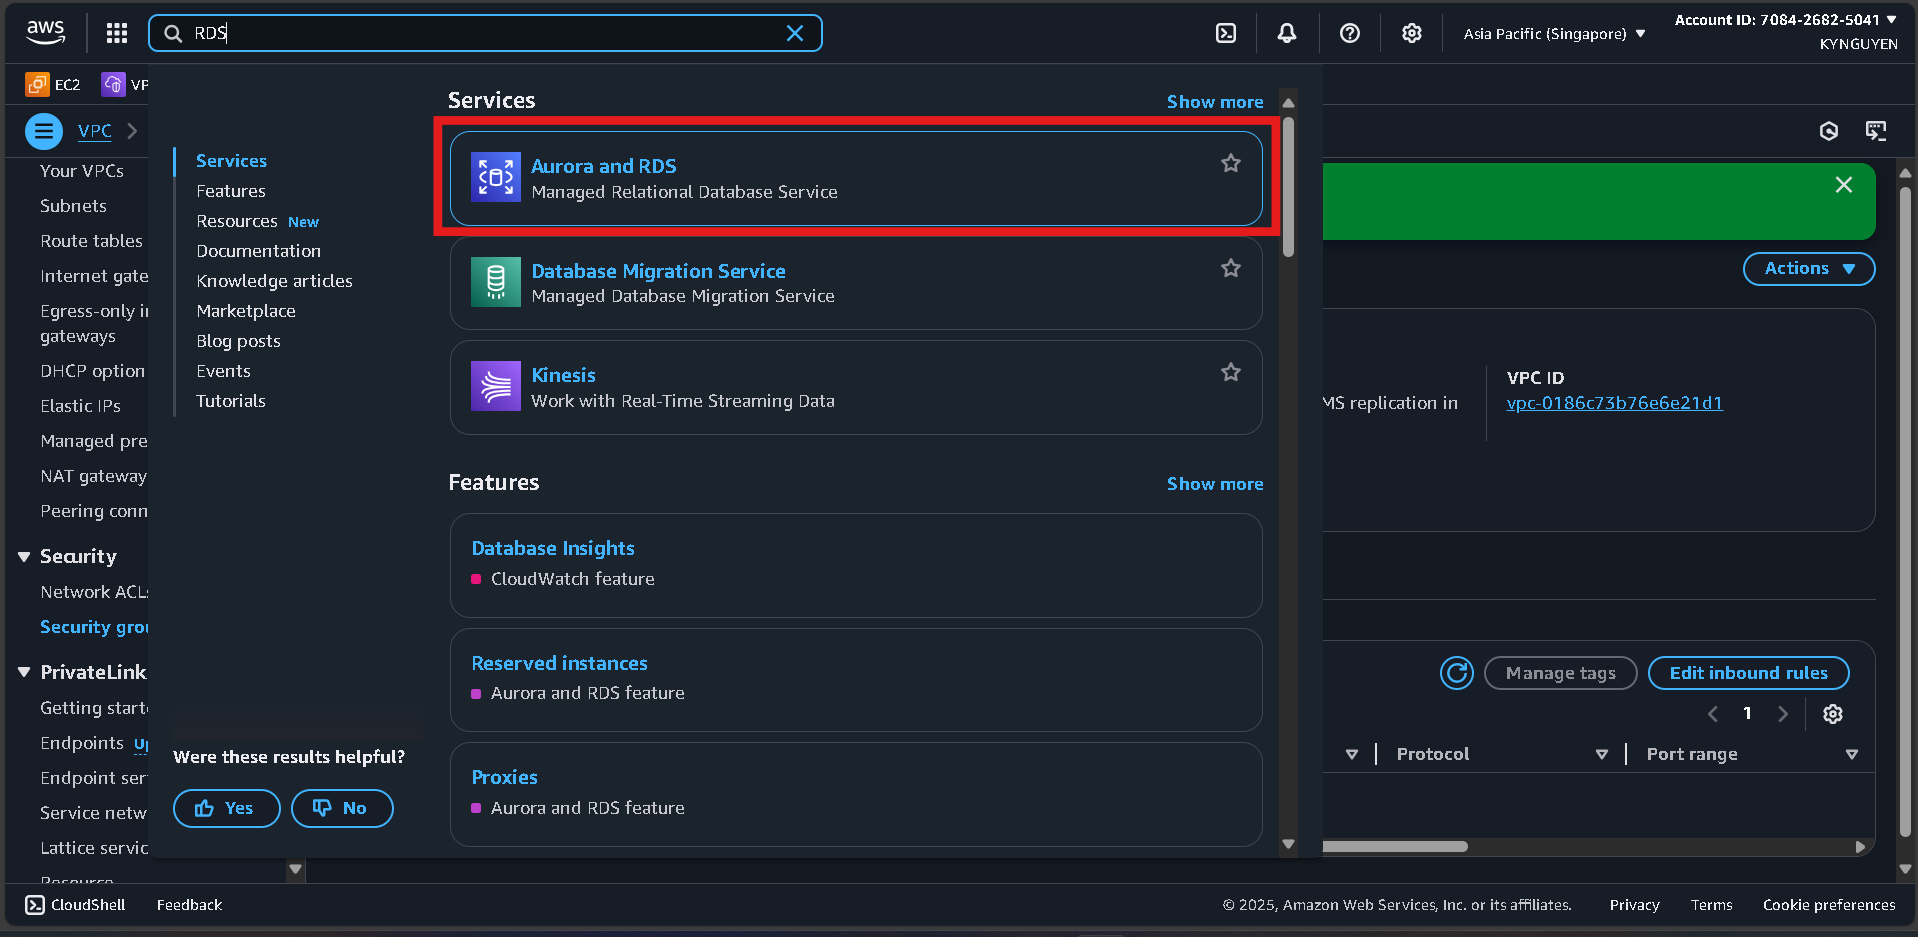
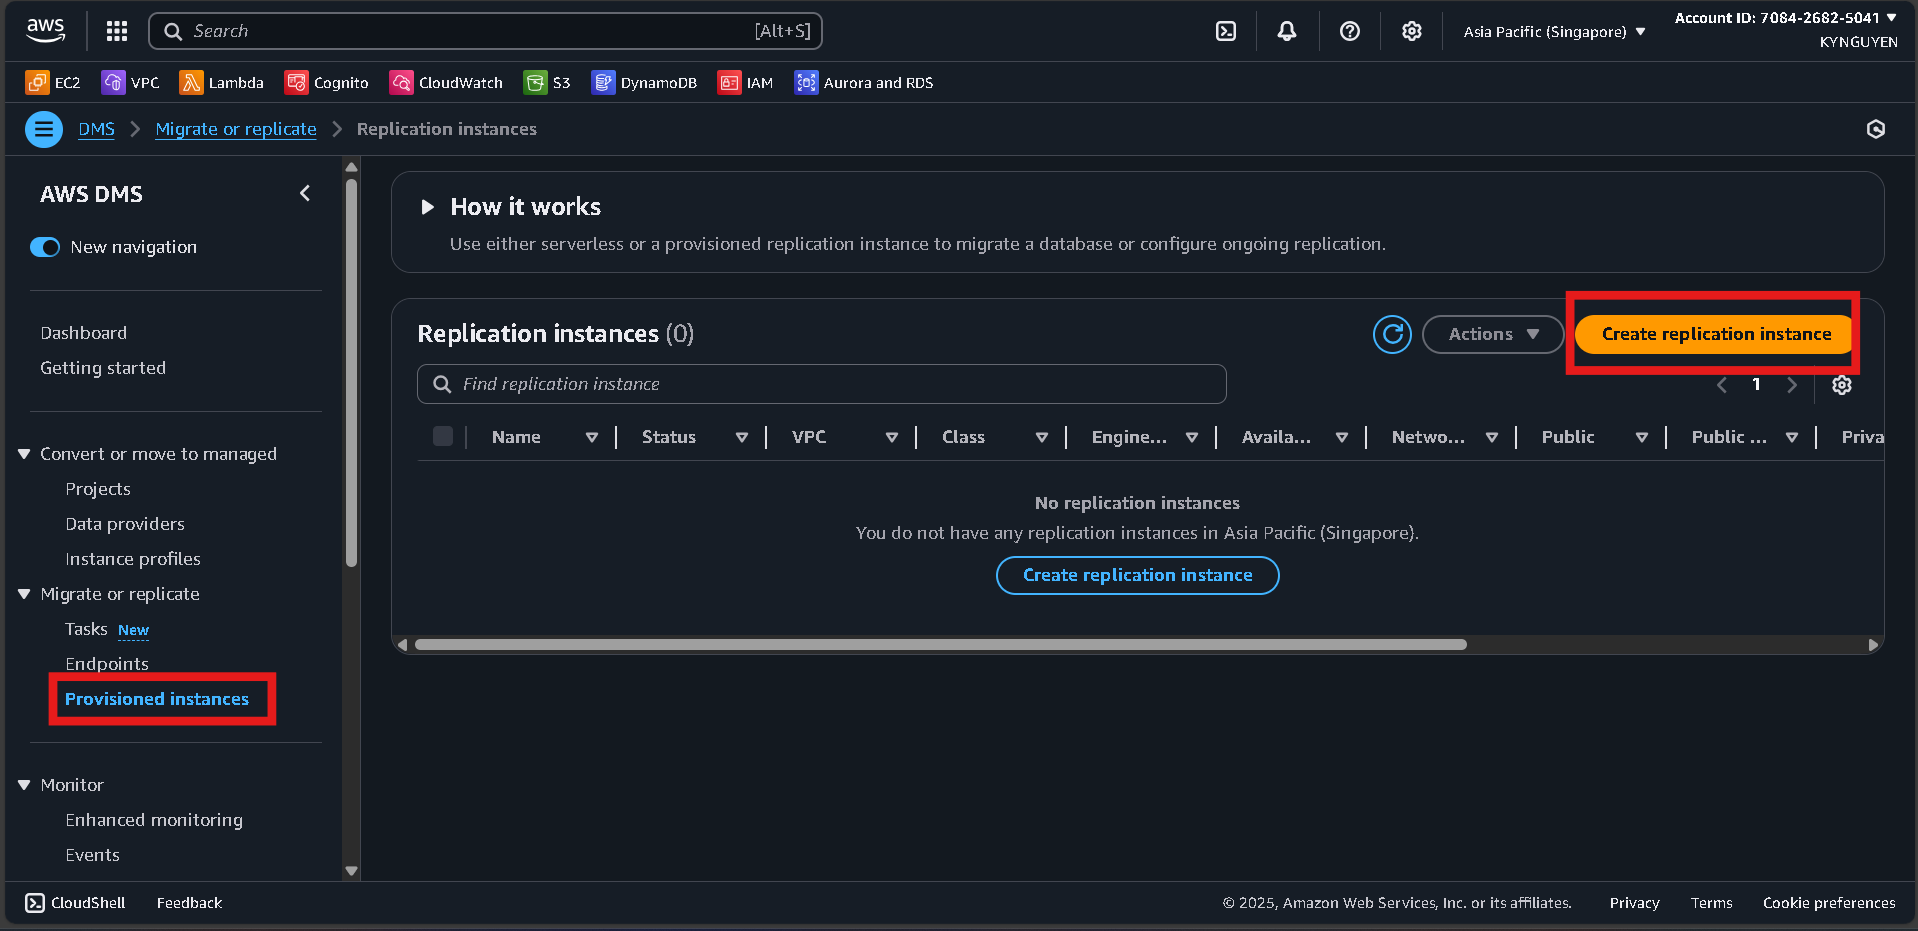
Access DMS Console
- Search for “DMS” in the AWS Management Console search bar.
- Click Provisioned instances.
Create Replication Instance
- Click Create replication instance.
- Configure:
- Name:
migration-replication-instance - Description:
Replication instance for database migration - Instance class:
dms.t3.micro - Engine version:
(latest) - Multi-AZ:
No(for cost saving)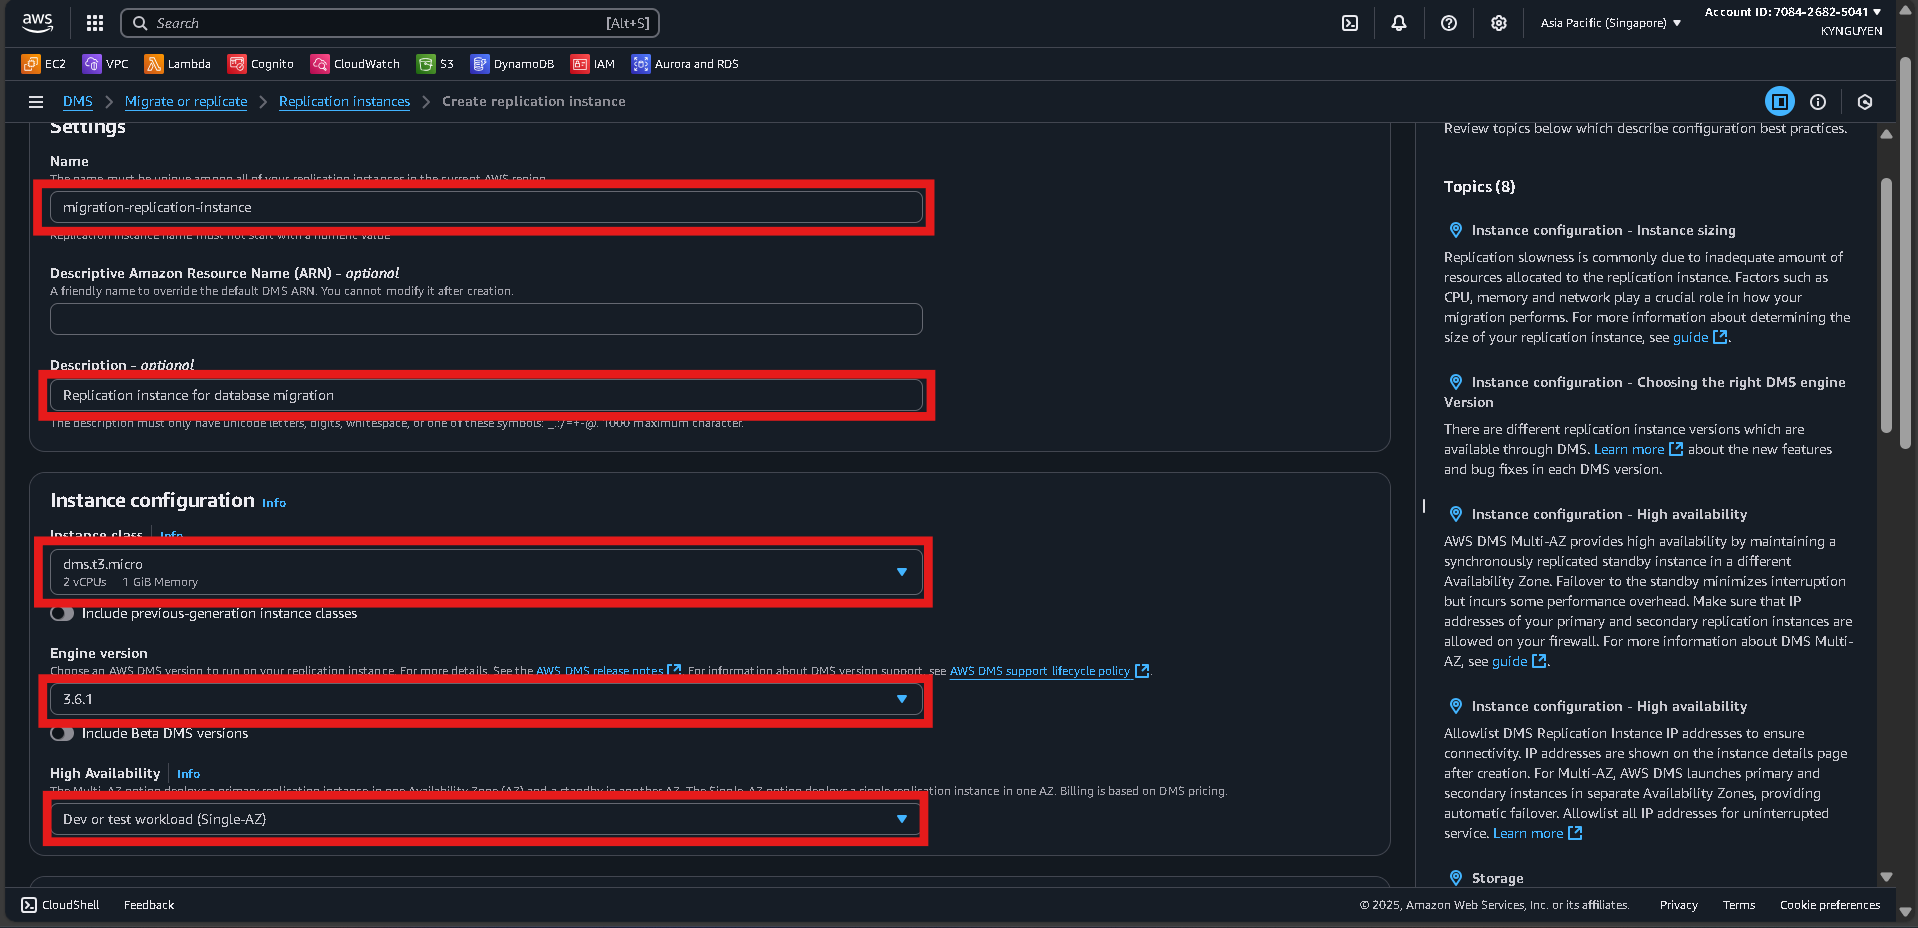
- Name:
Connectivity and Security
- VPC:
migration-vpc - Replication subnet group:
migration-dms-subnet-group - Publicly accessible:
No - VPC security group:
dms-replication-sg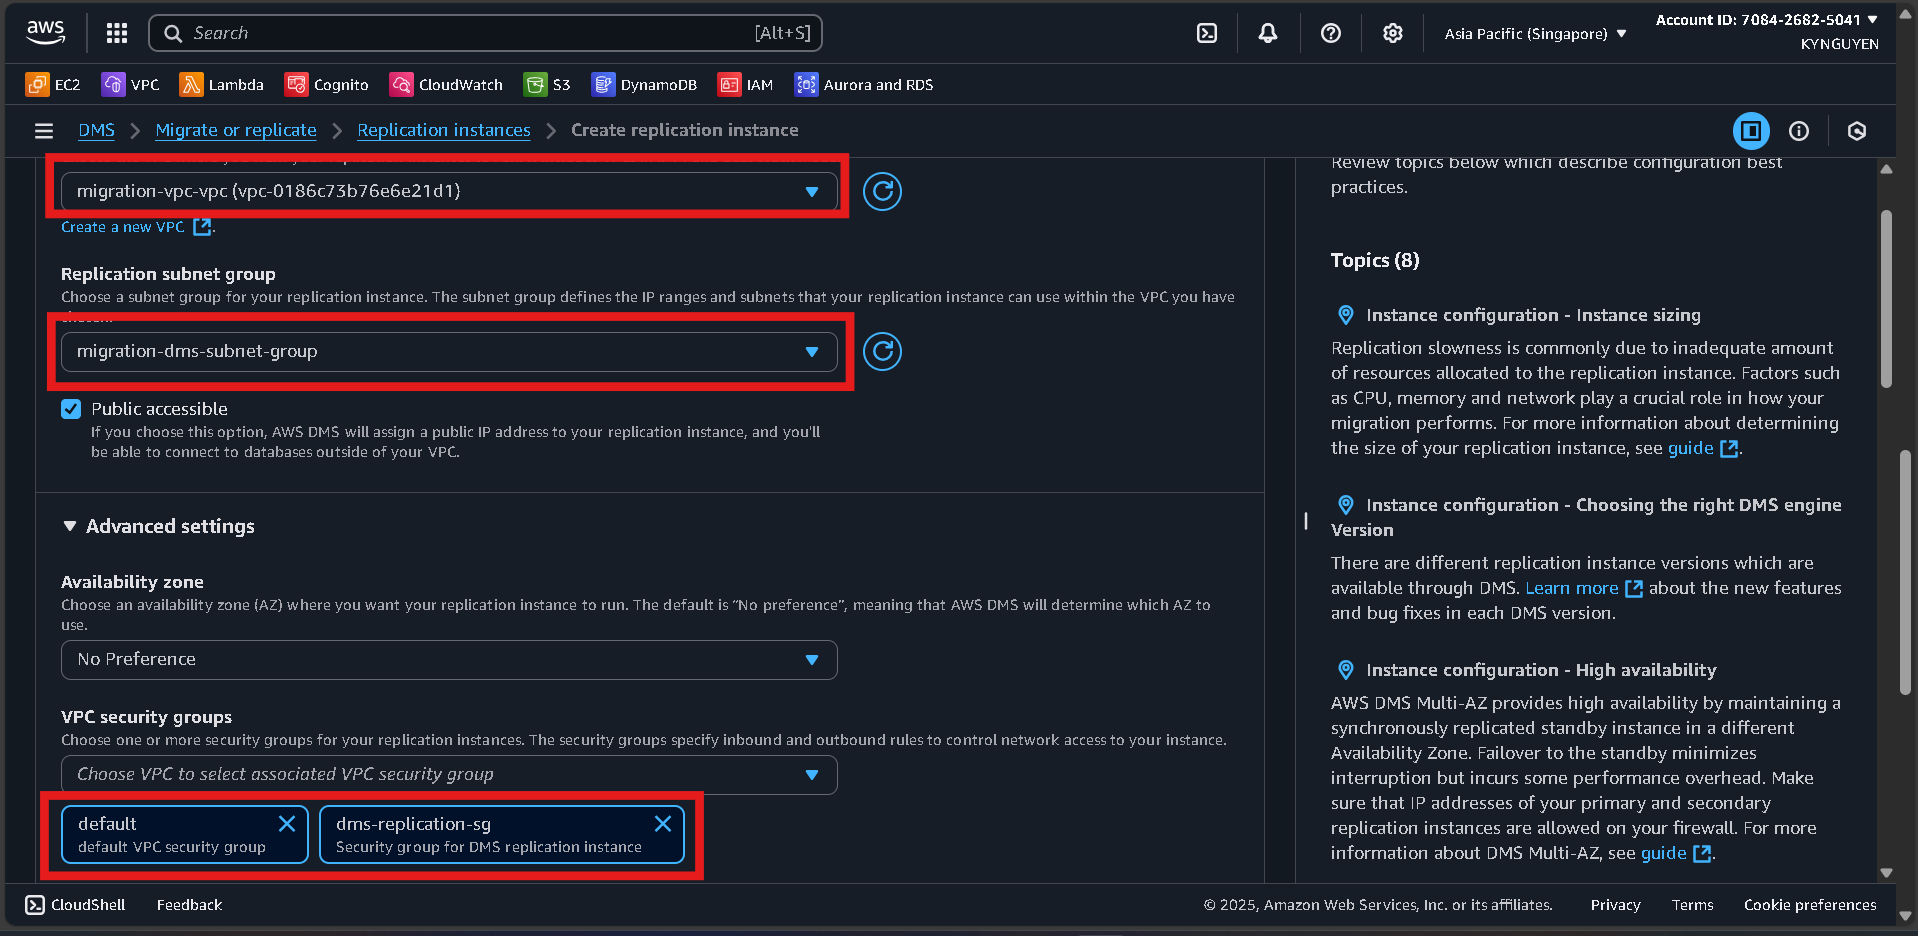 Click Create replication instance and wait about 10 minutes until the status is Available.
📝 Note:
Replication Instance:migration-replication-instance
Create Source Endpoint
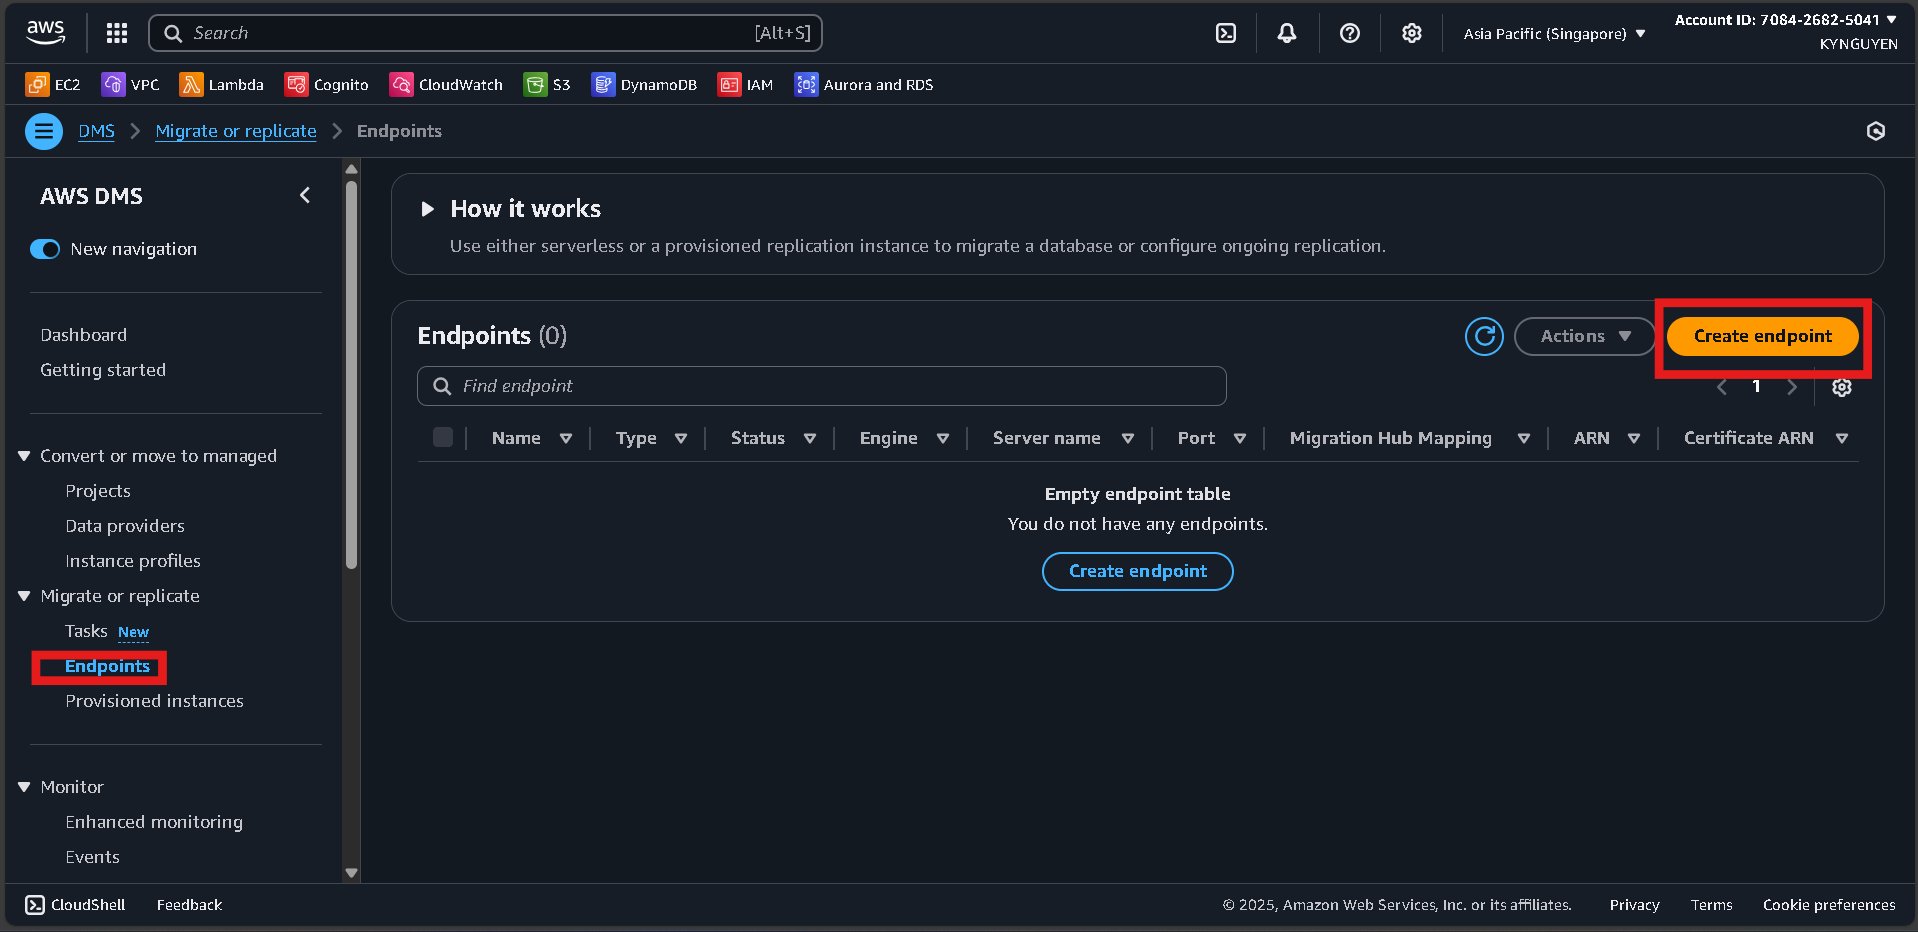
Access Endpoints
- In the DMS Console, click Endpoints.
- Click Create endpoint.
Endpoint Configuration
- Endpoint type:
Source endpoint - Endpoint identifier:
source-mysql-endpoint - Source engine:
MySQL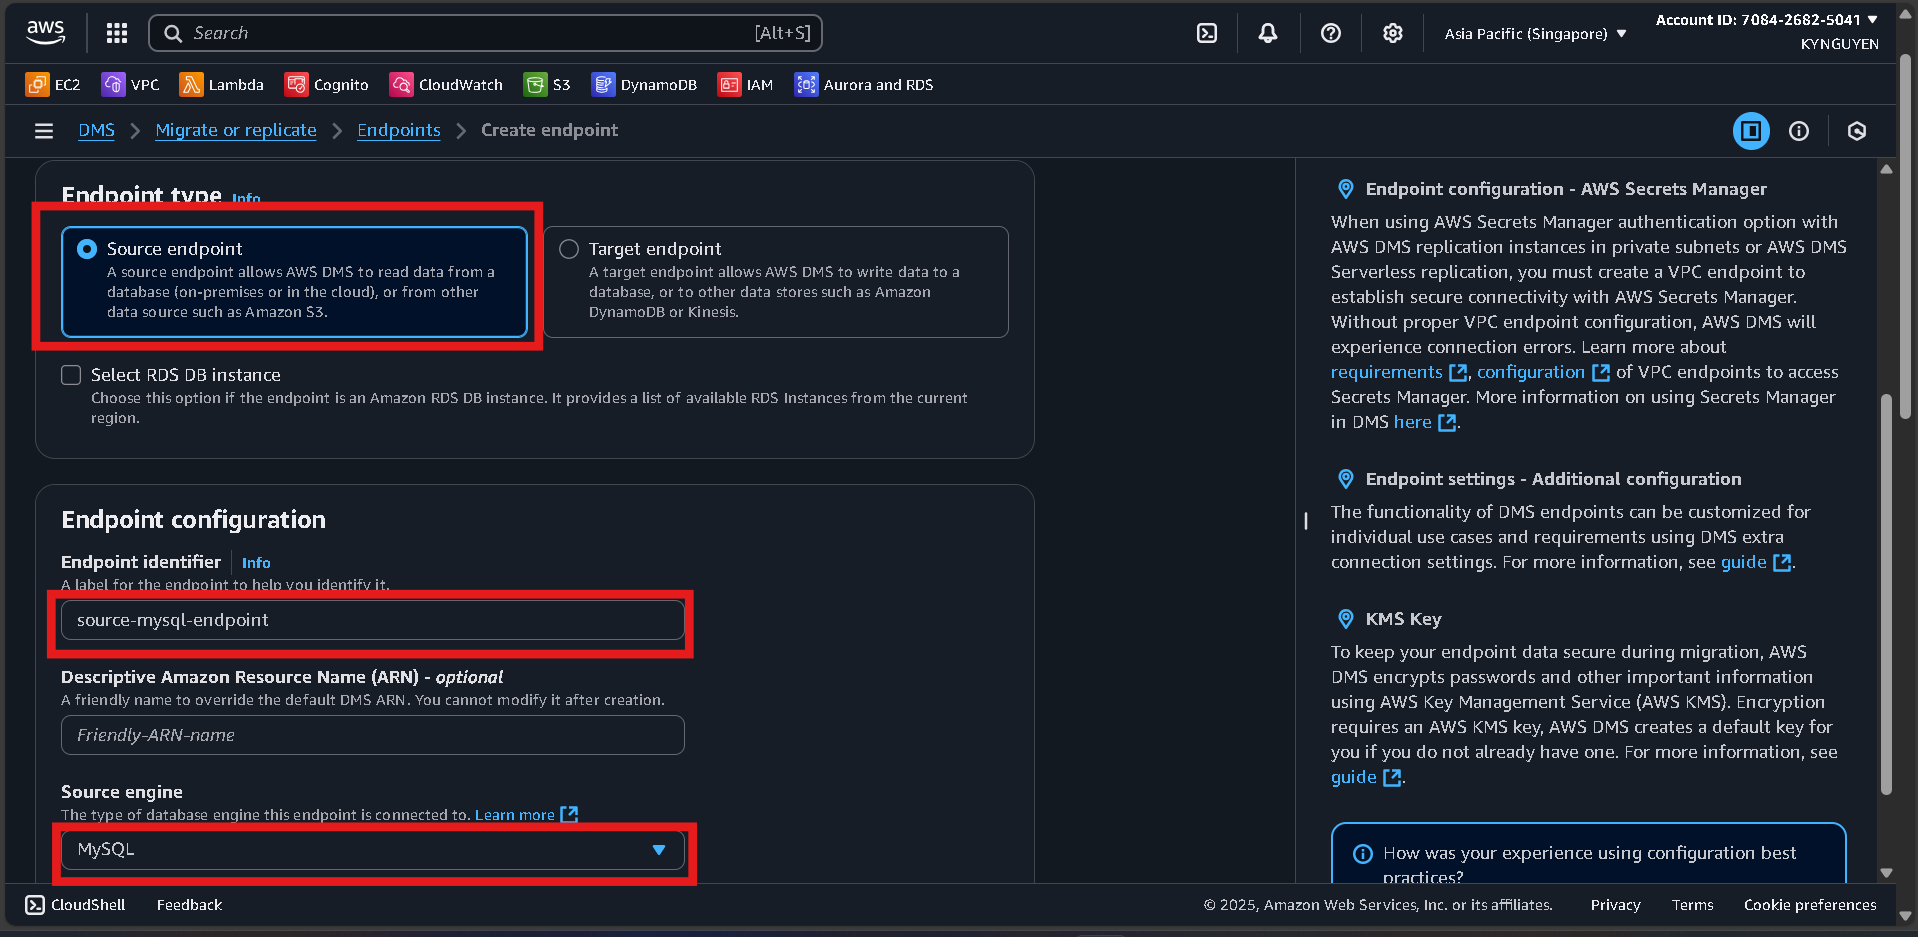
Access to Source Database
- Server name:
[SOURCE-MYSQL-ENDPOINT](copy from RDS -> Database -> source-mysql-db -> Connectivity & Security)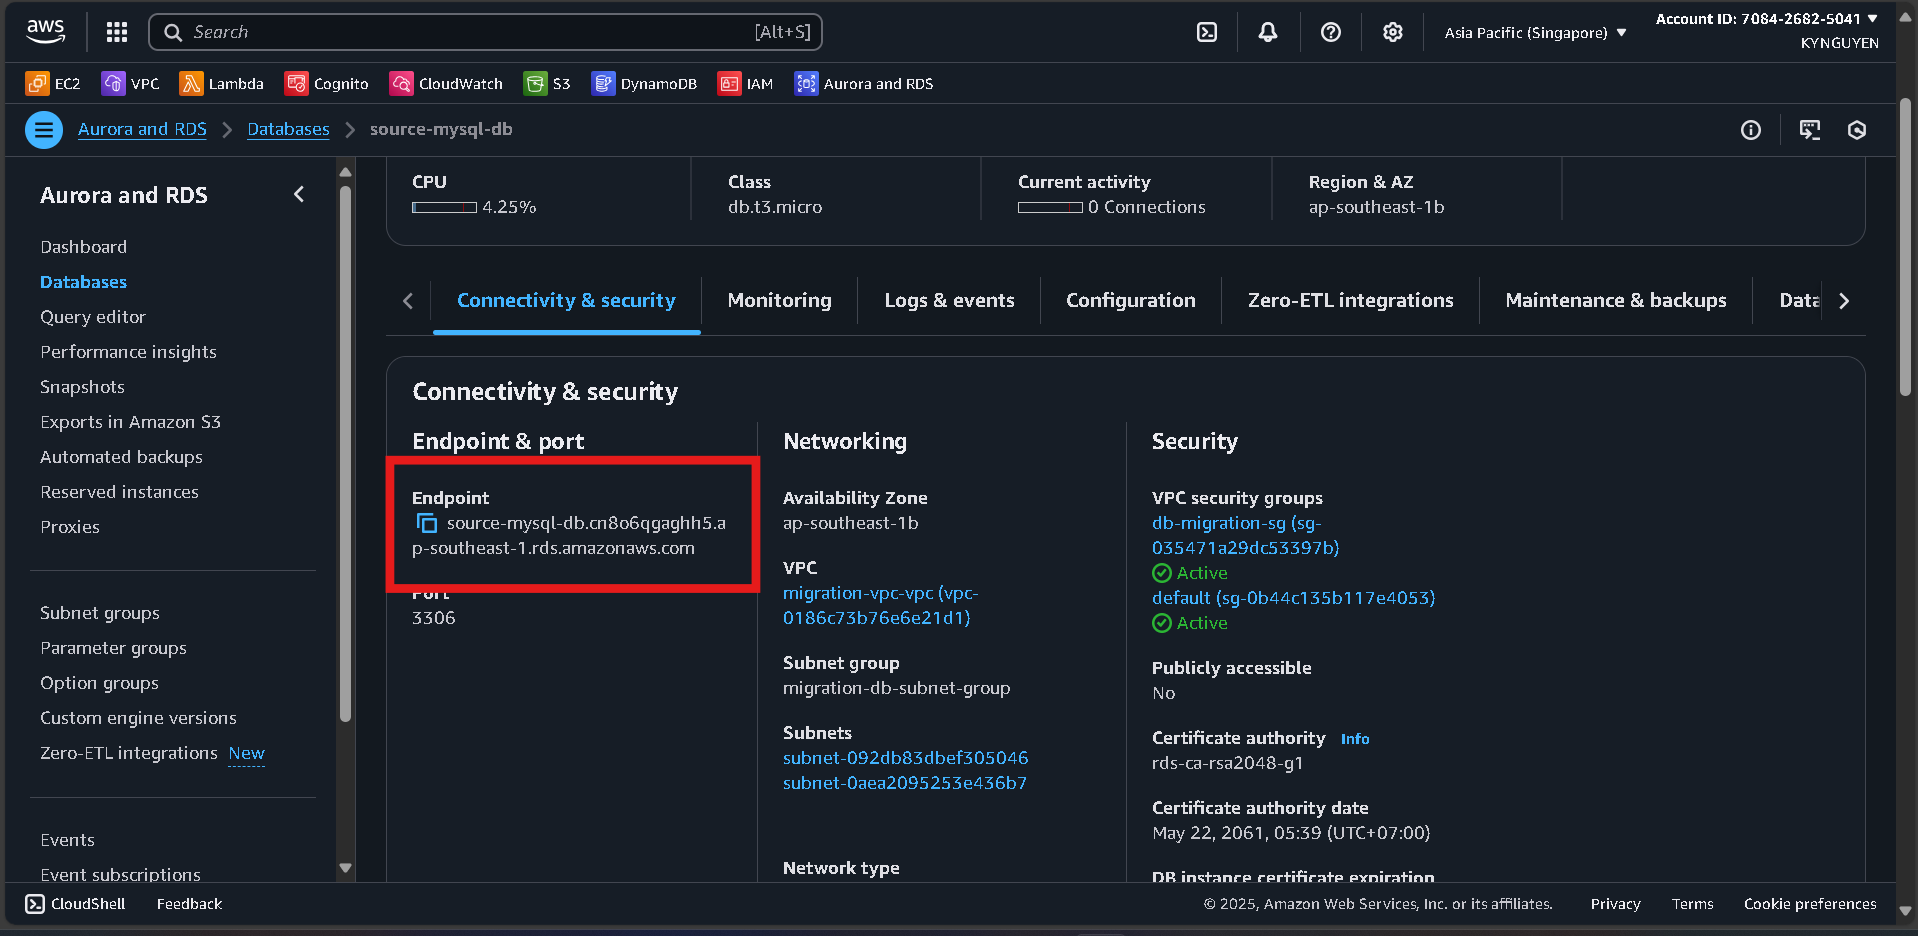
- Port:
3306 - Username:
admin - Password:
MyPassword123!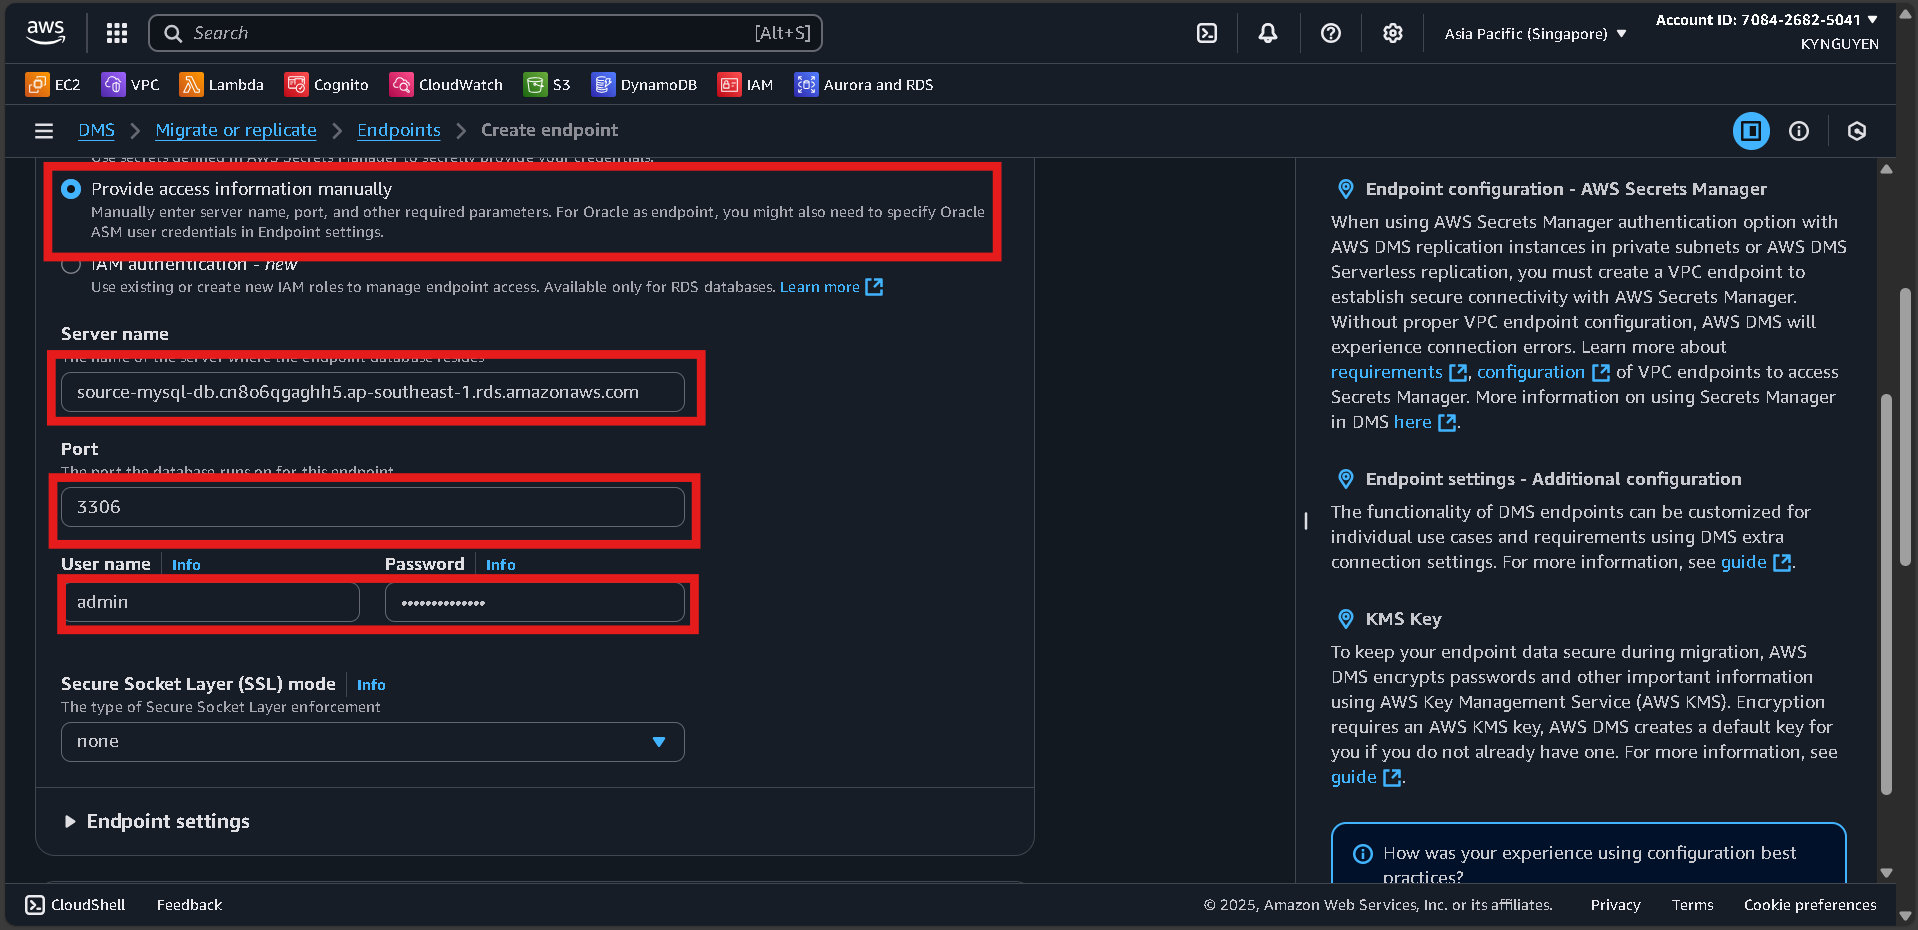
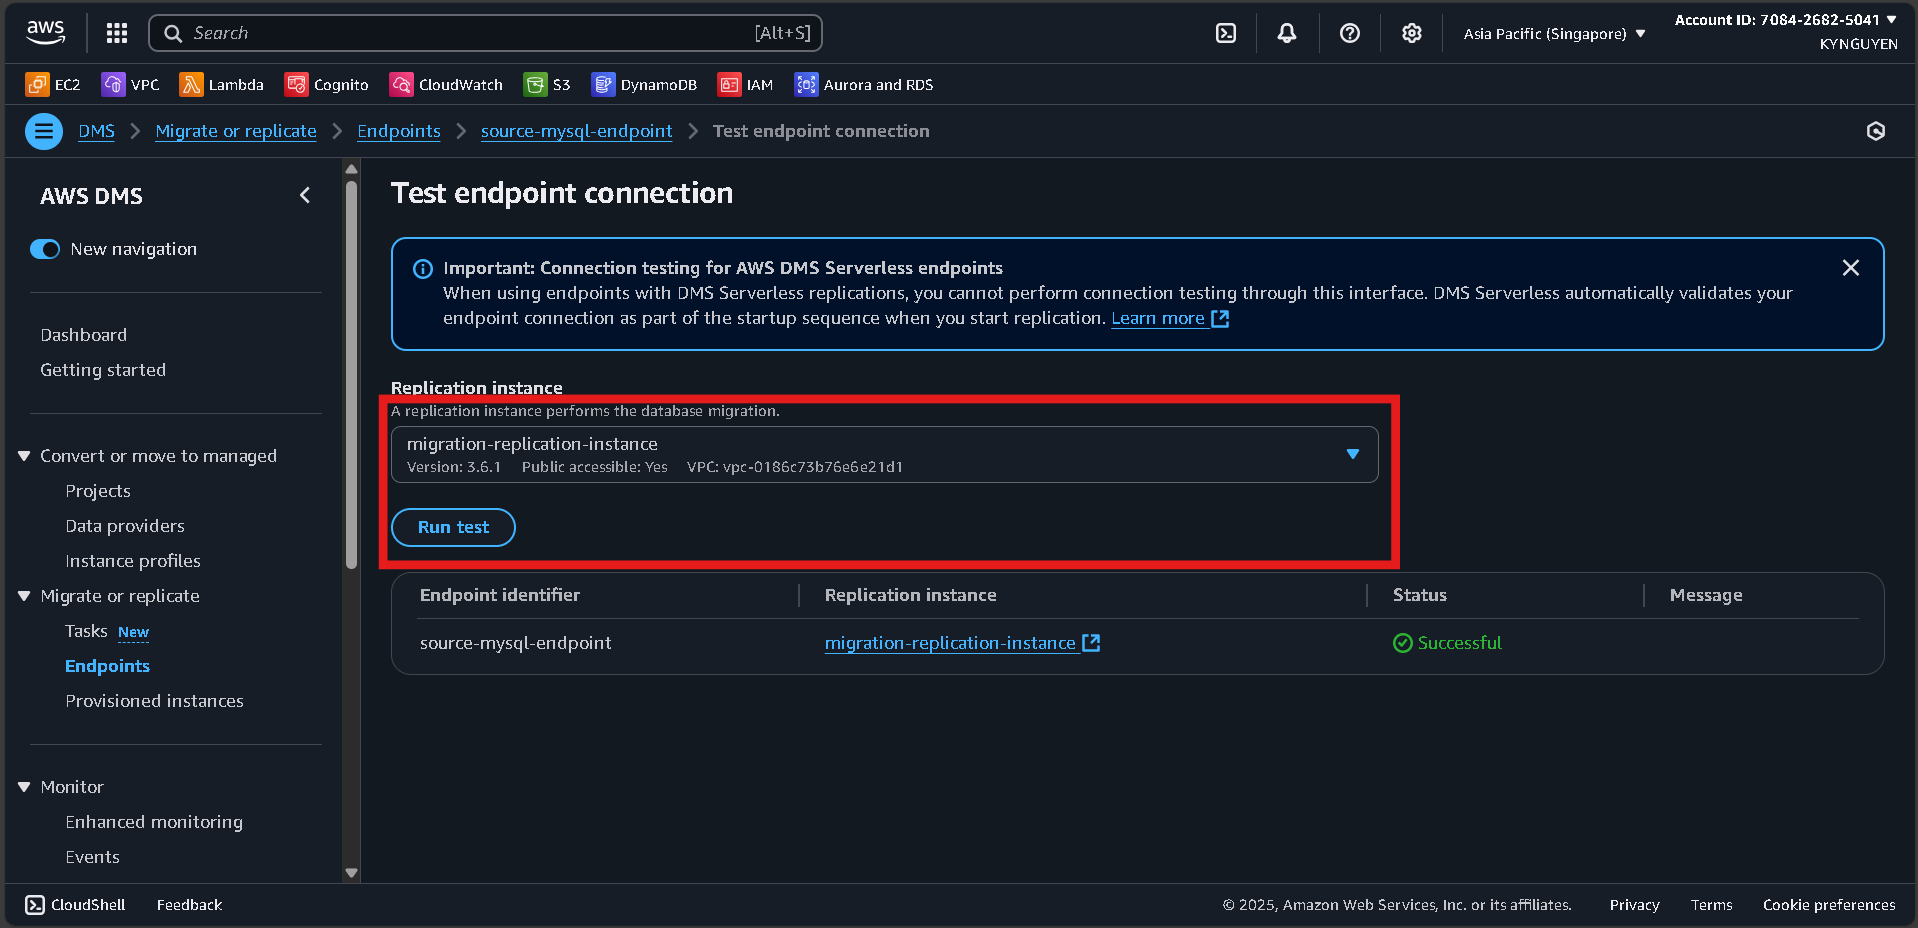
Test Endpoint Connection
- Click Run test.
- VPC:
migration-vpc - Replication instance:
migration-replication-instance - Click Run test again and wait until status is successful.
Advanced Settings
- Extra connection attributes: (leave blank)
Click Create endpoint.
Create Target Endpoint
Create Endpoint
- Click Create endpoint.
Endpoint Configuration
- Endpoint type:
Target endpoint - Endpoint identifier:
target-postgres-endpoint - Target engine:
PostgreSQL
Access to Target Database
- Server name:
[TARGET-POSTGRES-ENDPOINT] - Port:
5432 - Username:
postgres - Password:
MyPassword123! - Database name:
targetdb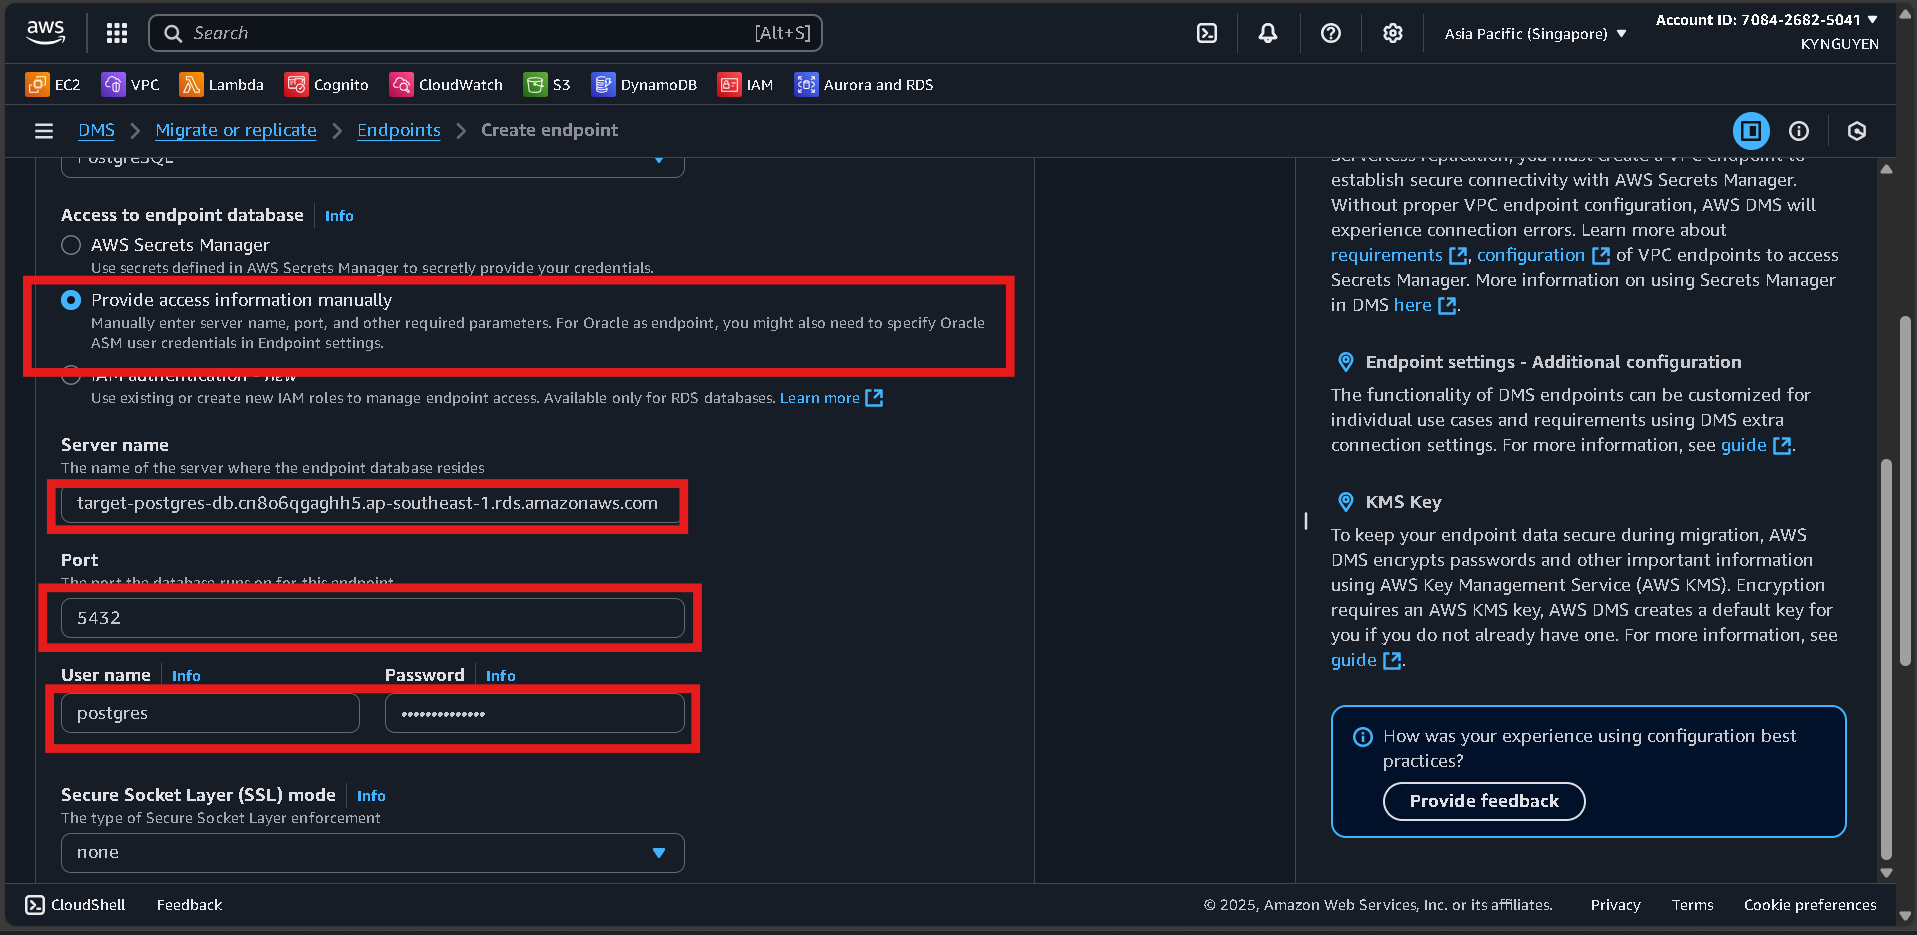
Test Endpoint Connection
- Click Run test.
- Replication instance:
migration-replication-instance - Click Run test again and wait until status is successful.
- Click Create endpoint.
📝 Note:
If tesing endpoint failed, go to db-migration-sg and add inbound rule: PostgreSQL (5432) → Source: (id of dms-replication-sg)